The outdoor pool is a beautiful and functional decor of the treacherous garden, which provides a wonderful opportunity to plunge into cool water in a sultry day. However, the need for regular cleaning, heated water, etc. Minimizing all the pleasure. That is why today many began to install special pavilions for pools, which are able to protect the reservoir from the garbage and extend the season for swimming.
Content

Today we will look at how to make such a pavilion with your own hands, as well as the design features of the finished product.
Paving and function of pavilions:

- provide full safety of pets and children;
- reduce electricity costs, which is necessary for water heating;
- prolong the swimming season;
- make less costly and easy reservoir care;
- protect the water and the surface of the bowl from the adverse effects of the external environment, etc.
Modern types of pavilions for the pool

Depending on the building materials used, they can be made of:
- transparent and colored plexiglas.
- polycarbonate.
- glass windows.
By type of design, they are divided into:
1. Prefabricated (sliding):

- for spa pools;
- combined;

- high pavilions;

- middle height;

- low pavilions.

2. Stationary.
In shape, such pavilions are:
- spherical;

- asymmetric;

- rectangular.

- Polycarbonate pavilions are a fairly low-cost option. From this building material, you can create a beautiful greater design, not inferior to a glass analogue. In this case, such a type of plastic allows you to build products of any complexity and shape, refracting ultraviolet rays, perfectly keeps heat, serves as about 10 years. The only drawback is not possible to use this construction in the winter season.
- Asymmetric (combined) buildings have a wall of different heights, thereby forming a unique design. In this case, the sliding front panels of the swimming hall perform the function of the doors.
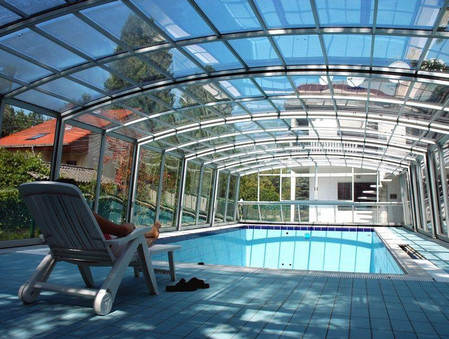
- High (up to 3 m) Indoor pavilions give a wonderful opportunity to relax next to the reservoir in any weather.
- Pavilions for round pools have the appearance of the ball and resemble a kind of sliding dome consisting of segments. The basis of such a product is the elements of mirror stainless steel, to which polycarbonate is fixed from 4 mm.
- Sliding pavilions for pools are a number of sections that are installed on specially intended rails. They can easily be transformed from a solid canopy into a compact and cozy awning on the edge of the reservoir.
- Low structures having a flat shape are a system that protects the pool from garbage.
- As for pavilions from double-glazed windows, they need a solid foundation and installation of a metal powerful frame. If you envision the heating of the room and water, then they can use the whole year. Such structures can turn your reservoir in a greenhouse, a closed area for recreation or a winter garden.
Thus, pavilions are built in the form of arched construction, which consists of polycarbonate plates, plexiglas, aluminum profiles, etc. However, the first type of building material is more preferable, since it is considered easy, durable and modern, while it has excellent thermal insulation indicators, refers to difficulty, resistant to chemicals and large temperature differences.
Construction of the pavilion for the dacha pool with their own hands
Features of the location of Pavilions

To select the design parameters, it is best to navigate the size of the site, the size of the pool bowl and personal preferences. Most often, it is made up to 8 m wide and a height from 1 m to 4 m.
Install the pavilion for paving around the reservoir or on the widest edge of the bowl. For a stationary type, a ribbon small foundation is usually created at a depth of about 30 cm. If you decide to start its construction at the initial stage of construction, then all the arrangement of arrangement is carried out in conjunction with the casting of the pool bowl. If the pavilion construction occurs at the level of the edge of the pool, then the glulation in the ground can not be done. To do this, the design is installed on a column foundation where the floor will serve as a wooden flooring.
Polycarbonate Pool Pavilion Recommendations for construction:

- initially, it is necessary to pour a solid foundation whose width should exceed the parameters of the future design by 6-7 cm;
- the thickness of the fondution having a double reinforced concrete should be from 50-60 cm;
- its cells are recommended to do the size of 20x20 cm;
- be sure to take care of strengthening the base with the help of ceramic tiles or porcelain stoneware;
- remember that the width of the future structure is determined by the guide elements, namely, the design of 5 sections requires a size of 50 cm, and from 4 sections - 38 cm;
- after the basis is ready, you can proceed to the casing of a metal frame;
- polycarbonate panels should be fixed to the profile by self-testers, under the hats of which are put on the washers from stainless galvanized iron;
- to strengthen fastening sites, it is recommended to use sealant;
- at the edges of polycarbonate sheets, it is advisable to use galvanized iron strips, bent up;
- the structure of the used building materials should be protected with silicone colorless sealant or specially designed ribbon.
Construction of the pavilion for the pool

To equip the pool with an indoor pavilion we need:
- dowel and screws;
- bulgarian;
- perforator and electric drill;
- crimping the corners of the L-300 mm size of 4x20x20 mm;
- steel profile pipe 1.5x20x20 mm;
- cellular polycarbonate 4 mm thick 600x210 cm.
Progress:
1. The frame of the roof of our pavilion will consist of arches, namely the right and left half bent along the pipe radius. The bottom of the pipe is fixed to the corner should be through, with bolts and studs. As for the corner itself, it is screwed up to concrete slabs and a pool bowl.
2. Arches racks (4 pcs.) It is necessary to fix in the upper part of each other using the plate and screws. In place of the docking of pipes should be inserted a round tube slightly smaller diameter.
3. Between the plans arches, screw the jumpers from the profile pipe. On the first side it goes about 3 jumpers. Thus, there should be 5 lines of jumpers around the perimeter of the entire design.
4. Locking the jumpers must be performed using plates in which 4 holes are drilled in advance. Fix the design is recommended for a drill with a drill and screws with a drill.
5. To properly bend the arc-rack, it is necessary to arrange the pipe between 2 wooden supports and on top to lay a rail. Then you should hit the latter and the pipe will bend. Thus, gradually moving the rail and pipe, we will get the desired configuration. Next it is applied to the metal on the lectal line.
6. Before starting the installation work, the entire metal design should be projected and painted.
7. When all the details are well dried, you can start the framework.
8. We begin marking the racks, given that the average sheet of polycarbonate will fit from the middle of the second rack until the middle of the third.
9. Drills in a concrete bowl of the reservoir of the hole and score plastic dowels in them. We set the corners into a vertical position and screw them with screws.
10. We collect on Earth two halves of arches-racks using bolts.
11. After installing the 4th arches, they should be fixed between themselves at the upper points with a jumper-tube.
12. Before you begin to fasten the polycarbonate, you need to seal the ends of the cells of plastic. The next step is starting to lay sheets. All work should occur from the middle sheet. Bashed building materials follows screws with pressshibe and drill 4x15.
13. If necessary, it is possible to bend polycarbonate sheets exclusively across cells.
14. At the end of the work, cut out the end part and make the door that is recommended to put on the loop.
How to build a pavilion for the pool with your own hands:


