If you have thought about how quickly and cheap to equip the ceiling and the walls of your bathroom, the choice of plastic panels as a finishing material will become the most optimal. Due to the constant change in the level of humidity in such a room, the risk of damping the coating increases. The decoration by plastic panels will be an excellent solution, besides, it will not require tremendous costs. If you fulfill all the work yourself, then expenses can be significantly reduced.
Content
Characteristics of plastic panels
Plastic panels are a fairly widespread finishing material because it is used in many rooms. First of all, the PVC panels play a decorative role, overlapping all visible areas of rough decoration of residential and non-residential premises, be it a balcony, storage room or bathroom. Panels are made of polyvinyl chloride on special machines by extrusion. A special solution is mixed with PVC mass, after which it is designed under high pressure in special forms. To better understand the properties of this material, we suggest familiarizing yourself with its advantages and disadvantages.

Advantages and disadvantages of plastic panels
Compared with the wooden "clapboard", the production of PVC panels is quite easier and cheaper. Plastic performs similar functions, while there is a number of features that are not inherent in wood coating.
Plastic "lining" has the following number of advantages:
- Lightness material. The panels have a rather small weight due to a relatively low PVC mass density and the hollowness of the design.
- Easy installation. To mount the design of plastic, no special skills and additional efforts will be required. Everything can be done by yourself, because all the structural components have low weight, and the installation technology is quite uncomplicated. To cut the panel or make a hole in it, it is enough to use the usual stationery, which will be found in the farm.
- Moisture protection. Plastic "lining" does not rot, and has high moisture protection properties. In addition, the occurrence of mold or fungus on such a coating is practically excluded.
- Soundproofing. Due to the dense clutch of the panels with each other, the noise level coming from the adjacent premises is significantly reduced.
- Heat insulation. When the walls are trimmed and the balcony ceiling, under the panel you can additionally put mineral wool, which perfectly affects the preservation of heat inside the room.
- Wide range of. A rich selection of color and design solutions allow you to choose a PVC panel to your taste. In addition, the surface can always be painted in any hue, or apply the pattern on its own sketch.
- Low pricing policy. This finishing material can be called "people's". It is used in the finish of most utility and technical premises, since it has a fairly low cost.

As you can see, plastic "lining" has a large number of advantages that put it in a number of popular and demanded materials for facing the premises. However, it is worth considering that the shortcomings are also available, although minor.
The main shortcomings of PVC panels are considered as follows:
- Perepecility. This property does not allow the premises to "breathe" because it does not give the material to participate in a water cycle. However, this problem is quite easily solved by installing additional ventilation.
- Contact with high temperatures. The use of this material is unacceptable near fireplaces, furnaces and other objects exposed to high temperatures. For the facing of the outer parts of the building, such a material is also not suitable, because when heated has a property to deformation and may even melt.
- Bad shock strength. Plastic panels are easy to mechanically exposed, since they have a low density.

If you prefer exactly this material, then carefully examine all the pros and "minuses" of such a coating. Match all "for" and "against". If we mount the ceiling in the bathroom with plastic "clapboard", it is better to immediately plan the ventilation points and spend all the cables required to connect the lighting devices. Use all the above councils, then the coating will serve you for a long time.
Features of the installation of plastic panels
Before starting the installation of plastic panels, it is important to consider some features without which it is impossible to achieve high-quality and reliable coating. To connect the panels use the "groove in the groin" fastening method. But it is worth considering that different means are used as an attachment.

To secure the PVC panel on the frame, use the following methods:
- with the help of kleimers (a special bracket is put in the groove, after which it is fixed to the frame with the help of treated nails with a wide hat);
- on liquid nails (the panel is wetted with a special adhesive composition, after which they are fixed to the doom);
- on the bracket (a special construction stapler shoot a cool bracket in the grooves "lining". It reliably fixes it to the frame);
- on the self-tapping screw (with the help of a fastener element, switched through the panel, is fixed to the frame).

To install a plastic panel with a qualitatively, you can use any proposed method. It all depends on the surface features and from the selected frame. As a dohes, it is possible to apply both a wooden timber and a conventional metal profile that is used when assembling plasterboard structures. But note that this option will be a bit more expensive.
It is important to choose the right pitch of the root. For example, when mounting on the surface of the panel walls in a vertical position, a step is not more than 60 cm. In the case of a horizontal installation and ceiling cladding, a step should not exceed 50 cm. These conditions are necessary in order to make the collected design.
Installation of plastic panels in the bathroom
Before starting the installation of panels, it is important to carefully prepare everything: get the necessary tool and material, collecting the doom, etc. When you were determined with the installation method, they chose a frame and picked up a coloring for the ceiling and walls of the bathroom, it's time to carefully calculate.

Flow material
If you want to get a qualitative result without spending a huge amount of funds, it is better to immediately calculate the amount of consumable material. This will help to avoid additional difficulties associated with the purchase and delivery of the missing elements of the future design.
Calculate the flow of plastic "lining" on the example of a ceiling measuring 3 to 5 meters, which will be attached to a wooden doom:
- Since the panels are mainly released in a 3-meter and 6-meter format, then the first option will suit us. The choice of 3-meter panels will reduce costs, having developed the material as much as possible.
- Depending on the manufacturer's company, the PVC panels are produced different widths and thicknesses. The most popular is a white glossy panel with a width of 200 mm and a thickness of 6 mm. Such "lining" is most common, because the right degree performs its function and is inexpensive.
- Therefore, we need the length of the ceiling to divide the width of the same panel (5000/200 \u003d 25 pcs). Thus, to sew a ceiling of 3 5 meters, we will need 25 panels with a length of 3 m. In the event that there is only a 6-meter option in the store, you need 25/2 \u003d 13 pcs (taking with stock).
- To calculate the number of starting profile, angular connections, end plugs and other elements, it is fairly accurate to measure the metrar. Based on the data obtained, the material is bought. Note that any edged material is always better to take with a reserve of 5-10%.
- To calculate the number of timber for the root, it is enough to know a step. For light suspended structures, there is enough interval of 1000 mm. Since the timber is posted perpendicular to the "lining", then for our ceiling, you will need 4 pieces of a 5-meter bar. However, such a length of the timber you can find it, it is more common in a 2-meter format. Then we need: (4x5 \u003d 20 m or 20/2 \u003d 10 pcs).

As we see, it is quite simple to make a calculation. It is important to produce the right measurements and take into account the size of your ceiling or walls. These actions will allow to purchase the material as close as possible so that by the end of the installation is the minimum of ramp.
Tools and materials
If you want to produce all the work quickly and without much effort, it is better to pre-acquire everything necessary. Some tools can be replaced easier, or borrow from a neighbor.

To install plastic panels in the bathroom, the next set of tools and consumables will be required:
- perforator, end saw, hacksaw, knife, screwdriver, screwdriver, construction stapler, hammer, level, rule, cutting thread, glasses, protective equipment;
- plastic "lining", starting and connecting profiles, moldings, dowel-nail 6x40 or 6x60, kleimers, self-tapping screws with presses, walled brackets 10-14 mm, mounted gloves "Liquid nails", gloves.
The above is an example of the maximum configuration of the instrument and the material necessary for the work of this kind. It all depends on the base and method of installing panels, so that some components can be replaced or removed at all. Such a simple set will allow you to mount the design quickly and efficiently.
Preparation of the foundation
Finally, you are thoroughly armed and prepared for installation work. In case you install the panel simply on the surface, keep in mind that it should be perfectly smooth. Playing the ceiling or walls if the design does not provide for fastening on the cut. Since the design will be indoors with high humidity, do not forget to water the base. Additionally, the ceiling or walls can be treated with antibacterial agents.

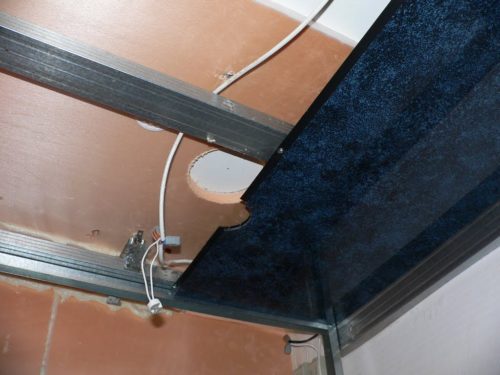
In the case of mounting on the frame, install the cheek. Note that the wooden bar is better to treat with a special water-repellent impregnation in advance, it will extend the service life of the frame. To install a metal frame, use the CD 50, UD 26 profile and the p-shaped suspension of the required length. It all depends on the features of your room. In any case, the more accurate the framework will be collected, the greater the plane it turns out.
To better understand the features of the installation work related to the installation of plastic panels, we advise you to view the following video:
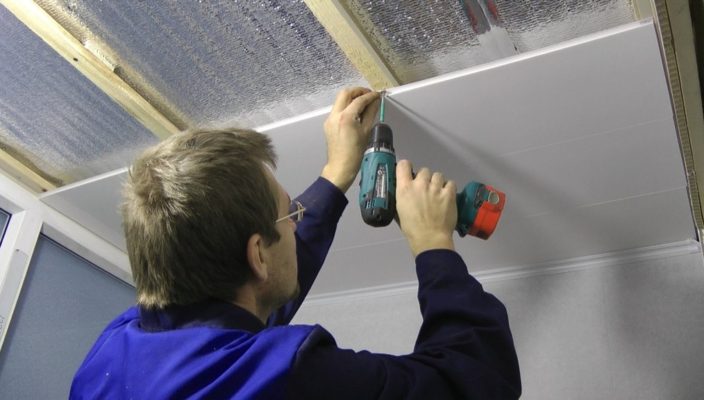
Installation of panels
To make all further actions, make sure that all preparatory work is made correctly. Check the base plane using the level and rule. Do not forget also about installing lamps. All wiring should be summarized before the start of the PVC panels doom. The devices that will hold the lighting elements must be prepared in advance and ready for fixation.

To bind the ceiling or the walls of the bathroom with plastic panels use the following actions algorithm:
- Start with the installation of the fastener. A wide part of the plank is attached to the cut with the help of screws. Step 200-300 mm will be enough.
- Cut the ceiling plinth on the length of the wall with which you will start the installation. At the edges of the plinth, set the corners. After everything is prepared, click the plinth to the fastener.
- Measure the length of the panel, which will be inserted first with a roulette. Small errors in 2-5 mm are allowed. Flaws overlap with a plastic angle.
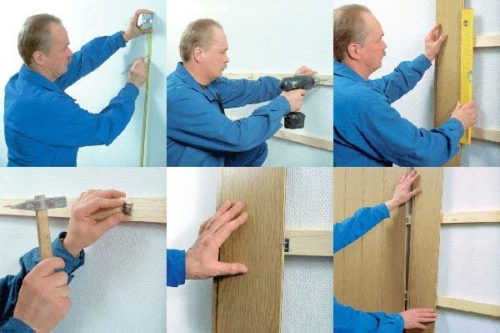
- In the gap between the plank and the plinth, shake one panel of plastic "lining". Insert the panel with a wide end so that the facial side looks at you.
- Continue to measure and cut the necessary pieces of panels. Do not forget to fix each panel. It all depends on the method you chose.
- For fastening lighting, strengthen design. From the same bar, cut a few pieces, connect them and secure it to the trough. Or use ready-made fasteners. Holes cut office knife or hacksaw. Print wire into the hole.
- To cut the last panel in length, it is advisable to take advantage of the rule. Transfer the measurements on both sides of the "lining", and then apply the rule and cut the panel along. Turn the panel, and make the cut again. Thus, you will achieve a more even cut.
- Mount the ceiling plinth to the fastener.
- Wipe the entire surface of the design with a damp rag with detergent.


As you can see, install plastic "lining" easy enough. It is important to prepare a high-quality and even foundation, as well as use a good tool and material, then the design will last you for a long time. We hope that in this article we widely disclosed the question related to the arrangement of the bathroom with the help of plastic panels. Compliance with the correct sequence of actions will be the key to the durable service of the future coating.


