If the family is added and not enough residential space in a country cottage, you can solve the problem with an extension to the house. This method has both advantages and disadvantages: it is necessary to perform volumetric facade works so that the extension is organically combined with the main structure. But there is an opportunity to perform work yourself, and there is no need to temporarily change the place of residence. Where to start and how to build an extension to the house - in the materials of this article.
Content
- What tools and materials need to be prepared for the construction of an extension to the house
- Basic requirements for an extension to the house
- Technology of construction of the foundation of an extension to the house
- How to build and poke the walls of an extension to the house
- Flooring device in an extension: Useful tips
- Nuances Mounting Roofing System Extensions
What tools and materials need to be prepared for the construction of an extension to the house
Modern technologies provide a wide selection of materials for construction and methods to combine them with the material of the main building. Existing (depending on the material) of wall varieties: frame, brick, foam concrete, rounded log, timber. Your attention is some rules and advice.

- There is no need to use the same materials for an extension from which the cottage walls are erected.
- When choosing materials, their quality and characteristics should be taken into account. For example, a brick: the walls of it should be constructed on a strong, monolithic foundation of deep downstream, and besides, the costs of insulation will be required. Slagoblock is preferable: it is cheaper, easier and its thermal insulation qualities is better. But the best choice will be aerated concrete: its weight allows you to build on the foundation of fine plug (about 0.5 m), and the wall in 200 mm does not require insulation.
- Frame technology allows you to quickly and with minimal costs to raise an extension of any sizes and configurations. The basis of the structure is metal profiles, OSB plates (pressed and glued with a special wood chips) and insulation. The disadvantage is a relatively low service life.

Frame-type extension room at construction
For the base device use:
- concrete solution (for filling the tape base), formwork boards, nails and screws for its installation and reinforcement;
- concrete foundation blocks for a columnar base that are placed on a pillow of sand and rubble;
- screw piles with a diameter of 90 mm and more.
The following materials are needed for the roofing device:
- timing with a cross section of 100 × 50 mm - for the manufacture of rafters;
- reiki, bars or USB slabs for crate;
- waterproofing rolled material and vapor barrier membrane;
- insulation (mineral wool);
- roofing material (metal tile, flexible bituminous tile, ondulin, ceramic tile, etc.).
Basic tools for work:
- shovel bayonge and soviet;
- construction level;
- concrete mixer;
- containers for kneading and plaster solutions;
- trowel;
- electric drill;
- perforator;
- hammer;
- screwdriver;
- roulette;
- axe;
- circular Saw.
For the floor of the floor, you will need a timing of 100 × 50 or 80 × 50 mm (for lag), edge-cutting boards, 40 mm thick or concrete with a cement-sandy mixture - for a screed device.
Basic requirements for an extension to the house
The additive part must meet the following operational requirements.
- An extension must be framed in accordance with the law.
- The main building windows should not be closed. There should be no obstacles to natural lighting.
- The fire resistance design should be no less than VI degree. It should be followed by the range of distances to other buildings.
- An extension should be organically fit into the landscape and combined in the architectural plan with the main building.
An extension should be organically fit into the landscape and combined in the architectural plan with the main building.
Technology of construction of the foundation of an extension to the house
In order to avoid mistakes at the very beginning of construction and the consequences associated with this, you need to know how to correctly calculate the size of the structure and pour the foundation. The problem consists in connecting the founding of an extension with the base of the main building: due to the sedimentation of the soil, cracks are formed in this place. As a result, the weight loss, the development of mold.

Problem areas formed during the construction of an extension
To prevent this, you must follow the following rules.
- Before the fill of the formwork of the founding of the extension concrete, it is necessary to clean the outer wall of the base of the house, pre-freed from the soil. Vertical waterproofing and insulation must be dismantled, after which the concrete is treated with a grinder with a special nozzle - a metal brush. After that, the dust is washed off and the surface is ground.
- In the outer wall of the foundation of the house, the holes are drilled into which the corresponding diameter of the reinforcement bar is driven. They must come out on the width of the future foundation. Before driving, a cement-sandy solution is applied.
- The outer surface of the foundation wall is recommended to repelly stamp to improve adhesion with concrete.

Ribbon monolithic foundation of an extension to the house
Tip: The connection of the foundations will be the best if you make a subpoper under the foundation of the house so that the new concrete fill is closed with the old.
Varieties and advantages of the foundation of different types for an extension to the house
There are four main types of foundations:
- slab;
- monolithic ribbon small breed;
- monolithic ribbon deep downstream;
- column (screw);
- pile.
The first form (columnar) can be used for the construction of small and light structures and it is not suitable for an extension to the house.

The principle of facilities of the columnar
The ribbon finely brewed can be used for attachments from aerated concrete, slag blocks and sandwich panels. His advantage is economy, disadvantage - in the complexity of the basement device.
Ribbon foundation of deep downstream is necessary in case of construction of brick or stone. Such a base is withstanding significant loads and does not freeze in winter. The shower of its walls allows you to arrange a basement under the entire extension area. The lack of a plated monolithic basis is that its construction requires considerable costs of concrete and time.
The pile foundation is necessary only for construction on swampy terrain.
Column or screw - the most economical way of the base device for light frame structures.

PEDIC DESCRIPTION OF THE CONTRACT OF THE BASE OF ANGUTE TO HOME
- In accordance with the work project, markup is performed at the construction site. In the soil, stakes are driven and between them stretch the cord along the contour of the structure.
- Dern remove, align the soil and rotate the trench, the depth of which depends on the type of foundation.
- Mounted formwork from boards, plywood sheets and bars.
- Reinforcement with rods with a diameter of 16-20 mm.
- Concrete poured. After the fill, it must be tamped with a special vibrator to eliminate air cavities.
Important: You can load the foundation after complete secretion of concrete - after 28 days. During this time, the base will become strong enough to withstand the weight of the extension.
How to build and poke the walls of an extension to the house
For walls from different materials, specific rules should be used during construction. Tell me how to build the walls in the extension with your own hands and how to dock them with the walls of the house.
- The frame design is fitted with the walls of the house by mounting vertical bars with anchors. The slits are filled with mounting foam.
- The docking of the brick and block walls is performed using fittings, which are driven into the drilled holes (by analogy with the docking of the foundations). The length of the rod is about 40 cm. They must be drunk every 4 rows, and at the same time, it is necessary to retreat from the edge of at least 3 cm. Subsequently, the pins occupy a place between the rows of masonry material and reliably connect the buildings.
- In the event that the brick (block) extension must be docked with a wooden house, specially made P-shaped elements from metal are used. The average part of them is attached to the wooden walls, and the side wicked bricks or blocks.

Docking walls
How to insulate an extension from the inside correctly depending on the material of the walls
The extension walls of the sandwich panels (frame design) in insulation do not need, as the thickness and material of the insulation, laid between USB plates, should provide the necessary heat insulation. Walls of brick and foam concrete is recommended to insulate outside. But in the event that this was not done at the construction stage and the outer decoration of the walls is already performed as follows.

Layout of the insulation between the bars of the crate
- To the walls of the extension on the side of the room fasten the crate of metal profiles or wooden bars. The shaft step is 60 cm (on the width of mineral wool plates).
- Between the bars of the crates is laid by the insulation - mineral wool 50 mm thick.
- On top of the crates with the insulation of self-drawers attached plasterboard.
- The junctions between the sheets of drywall are filled with Satengips and are sickled with a ribbon of sickle.
- The walls are aligned with the finish stengips, processed by primer, stick the finishing material or color.
Important: Before closing the walls with mineral wool slabs, they are treated with an antiseptic means to avoid the development of mold fungi.
Another method of insulation involves fastening the foam plates to the wall with the help of glue and plastic dowels with a wide hat. A plaster mesh is pasted on top of the insulation, stengips is applied and then the finishing material.
In addition to these methods, new technologies based on the use of "warm" plaster are used: a special mixture with low thermal conductivity.
Flooring device in an extension: Useful tips
Paul varieties in an extension:
- concrete monolithic stove with cement-sand aligning tie;
- wood floor of bars and boards or using thick (16 or 32 mm) USB plates.

Installation of lag wooden floor extension
Before making a decision, what technology to use, the advantages and disadvantages of concrete and wooden floor should be studied.
- Concrete floor can not be used for an extension with a bar or screw base.
- The pouring of concrete floor is complicated by the need to mount formwork and reinforcement.
- Concrete floor requires additional thermal insulation.
- The strength and durability of the concrete floor significantly exceeds the characteristics of the wooden.
- The floor of the board has good heat and sound insulation characteristics.
- The wooden floor does not have an additional load on the construction base design.
- Paul from bars and boards Mount faster and easier. It can be used immediately after the installation.
- The life of the wooden floor is smaller than concrete, it is susceptible to the destructive influence of humidity, fears insect pests, open fire and mold fungi.
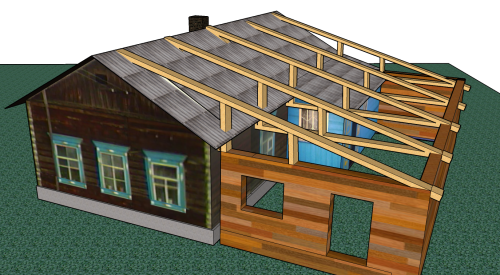
Nuances Mounting Roofing System Extensions
The roofing system of an extension can adjust the deaf wall or connect with the roofing system of the house. In the first case, the location of the roof compounds with the wall is sealed using a mounting foam, a waterproofing bitumen and a closing joint of a special profile from a galvanized or coated iron enamel.

The second method involves a partial disassembly of the roof of the house with the subsequent fastening of the triggering of the embedding or on the side - with spills. Disabled roofing material can be reused.

Example of docking roofing systems
The last stage of the construction of an extension is the installation of glazing, installation of doors, installation of the heating system and internal finishing works. After filling the interior, the new room will be ready to operate.
At the end of the article on how to build an extension to the house with your own hands - video with explanations of a specialist of some nuances of work.


