Any owner of a private house sooner or later begins to think about the need for an external finish of the front. As practice shows, siding is best suited for this. It is quite simple in the installation, so even a non-specialist can cope with him, guarantees aesthetic appearance of the house, and also provides additional protection against moisture. In this article we will talk about how to consolidate siding to the frontton at home.
Content
What you need to know about the front alone?
Before you begin the choice of material to cover the front, you need to understand which functions do this element of the facade and why is it built? The frontton is called part of the house located between the roofing rods. Depending on the purpose of the subcoase space, methods of construction of frontones are distinguished. So, if it is non-residential, the height of the front can reach no more than 1 m. If you plan to make a attic, then its height will vary from 2 m and above. You also need to choose a finish method from destination attic - whether it is a separate room or continuation of the walls. In the first case, the heat and waterproofing is required.

Requirements for the frontoth:
- Protection of the undercase space from wind, precipitation and cold.
- Ensuring the rigidity and strength of the roof.
- Aesthetics.
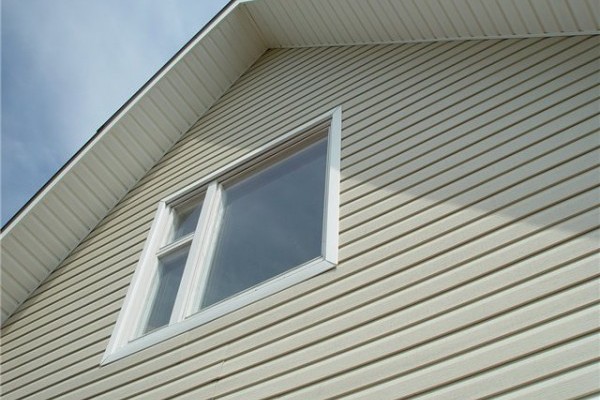
Based on these requirements, many choose to finish the front of the siding, because it is distinguished by resistance to precipitation, does not fade in direct sunlight and provides an attractive appearance of the building.

To sew a frontoth siding, there is no need to carry out large-scale preparatory work. For this purpose, you can use both ordinary vinyl siding and base, characterized by increased strength. A large selection of colors and textures allows you to realize any designer idea and make the facade beautiful and original. You can install siding on absolutely any surfaces: brick, concrete, wood, stone. This is one of the most inexpensive, fast and simple ways to external wall decoration at home.
Preparatory moments
Before mounting Siding on the fronton, the latter needs to be cleaned from the old finish coating, remove the dirt and delete. If the fronton is made of wood, the boards must be treated with antiseptic and hydrophobic primer deep penetration. The surface needs to be dried and align as much as possible. The permissible difference in height can be no more than 10 mm. Otherwise, siding is quickly deformed.
Installation on the crate
If the surface alignment is too expensive or take a long time, siding is mounted on the crate. For example, in the buildings of the old type, the outer surfaces of the walls are not different, so in this case the material should be fixed only to the frame. This method has its advantages - the lamp not only guarantees the correct and high-quality installation, but also allows you to produce additional insulation of the walls. Therefore, even if you are a happy owner of the house with perfectly smooth walls, but you plan to make a residential attic, it is better to make a frame and lay insulation under it.

The doom can be made of wood or metal. Metal frame for obvious reasons is more preferable. It is not subject to rotting, more durable and durable. However, its cost can confuse economical owners, so many prefer to build a wooden crate of unnecessary lumber or cheap wood of coniferous rocks. But if possible, the framework is allowed to be better installed from galvanized aluminum profiles. By the way, the same rack profiles are used to work with plasterboard. The products are much lighter than wood, so they do not carry a significant load on the foundation or wall of the house.
To fix the guide profiles to the frontton, use only galvanized suspensions. Install the racks in 50-60 cm increments. Since the metal frame is stronger than wooden, a step can be increased.
After mounting the frame for insulation, the attic or attic must be laid waterproofing and insulation. Ideally, you must first set the surface of the wall with a vapor insulating film, then insulation, and then close everything with waterproofing. For the insulation of the front, the most ordinary and cheap materials are suitable, such as mineral wool or polystyrene foam plates. As a waterproofing, it is possible to use a construction dense film with a thickness of 200 microns.
Calculation of materials and fittings
Before you go to the store for siding, you need to calculate how much it will be required for the front. In addition to the material itself, you will need fasteners, which is better to acquire the same manufacturer. For the most correct calculation, it is necessary to make a drawing of the building at a convenient scale.

What accessories will be required to install the Siding on the fronton:
- mounting planks;
- J-profiles;
- connecting H-profiles (the brass is not recommended to be connected to the joints and water penetrate into the joints);
- window profiles (if there are windows in the front);
- finish profiles.
Attach siding outside can be only galvanized fasteners. Any others will quickly start rust and bring all your effort to zero.
Montage siding
As we have already spoken, despite the evenness of the walls, it is better to mount siding on the crate. If the panels are installed horizontally, the elements of the crates must be attached vertically, and vice versa. By the way, the vertically located siding looks more familiar and visually makes the house above. The installation step of the crate of the crate is 30-40 cm.

Install starting j-profiles
If you are making facing frontion siding for the first time, pay special attention to the installation of starting profiles. On the correctness of their installation depends on the subsequent work and the final result. Pay this stage of work so much time as needed.
Progress:
- Arm yourself with a construction level and find the lowest point on the frame. Return up 5 cm from it and mark this place, unluckously screwing it there.
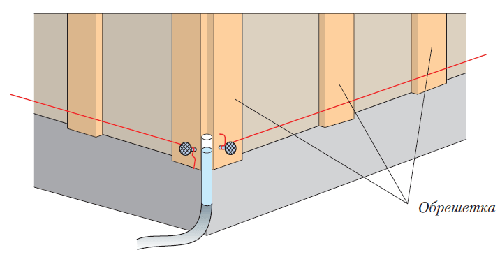
- Moved across the entire area of \u200b\u200bthe fronton, mark the location of the starting site of the starting profiles. Between the first and last fasteners, tension the rope and mark on the lattices of the crate of the border of the arrangement of angular profiles. To do this, attach it to the corners of the frame and mark the pencil.
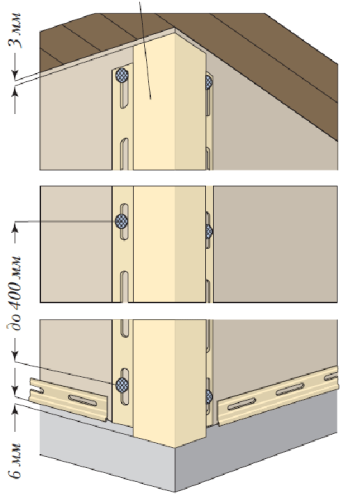
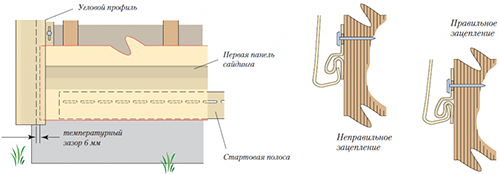
- Moving along the rope, keep the horizontal indent of 6 mm wide from corner profiles and attach to the j-profile frame. When installing, consider that between the elements you need to leave a gap of 10-12 mm so that when the temperature drops, they do not come into contact with each other. Also, the distance must be left between nail straps and profiles.

- If you want, you can not make a distance of 6 mm, but simply to shorten the nail strips so that at temperature oscillations they did not get to the starting profile.


When installing starting profiles, constantly monitor their horizontal building level! If the horizontal is broken, siding shifted, and fix it will be very difficult.
External corner profiles
Before attaching the corner profiles, install or place the sofa so that you can clearly see where their edges will run.
Progress:
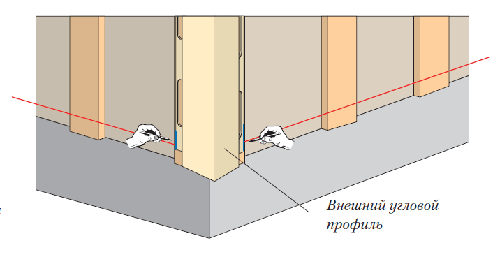
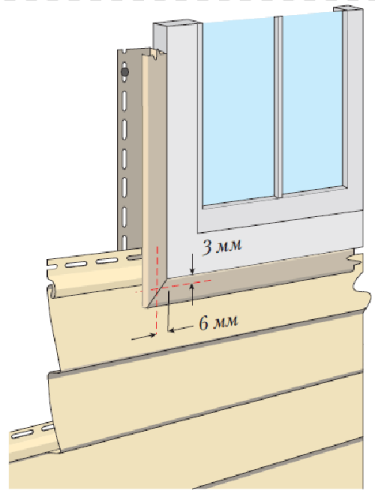
- Put a profile to the corner of the frame in such a way as to leave between the roof or sofit about 3 mm. Fix profile by screwing the screws at the top of the two-sided holes intended for this.
- While the upper end of the profile is 3 mm from Sofita, the lower edge should be lowered by 6 mm lower than the starting element.
- Make sure that strict vertical is observed, and then fasten the bottom, and then screw the remaining screws. In the angular profile the fastep is not better installed too often.
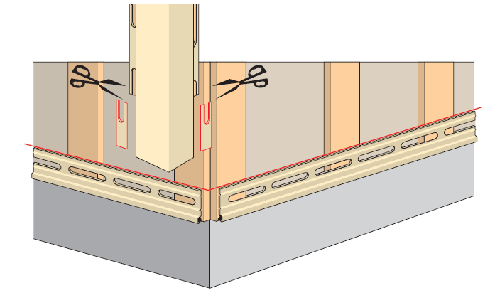
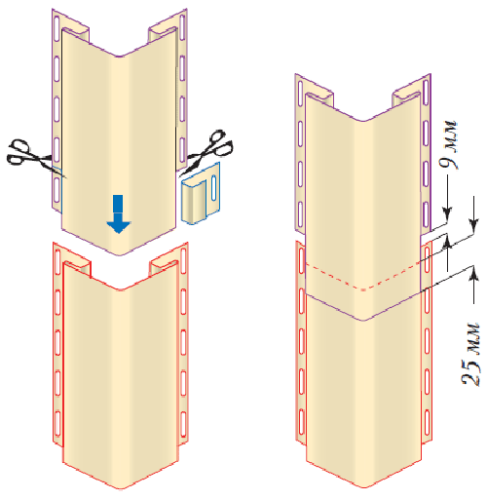
- If the elevation is greater than 3 m, and the profile lengths are not enough, then you will have to apply 2 profiles to each other. To do this, cut the top so that between the fasteners leave the distance of 9 mm and the backstage of 25 mm. Profile extensions must be made at one height for all rows.
- Instead of an angular profile, you can use the pair of J-profiles, which will help save at work. However, this solution has a disadvantage - the angle waterproofing will be not as good, so the wall under profiles is better to smoke with waterproofing material.


Installing panels
So, when all the preparatory mounting elements are fixed, you can proceed to the front of the frontone siding with your own hands. You need to put the first panel as carefully as the starting profiles, since the final result depends on this. Start work is best with the most imperceptible part of the front, to practice and correct possible shortcomings.
How to shepherd Fronton Siding:
- Insert the panel into the locking openings of the starting and angular profile. At the same time, do not forget that you need to leave a distance of 6 mm to the bottom of the castle of the angular element. As a result of changes in temperature on the street, the physical characteristics of siding may change. So, in a cold winter, a solid panel can increase by as much as 18 mm. These gaps do not allow the placement of the material to provoke the creation of waves and surface deformations. When you put the panel in the locks, attach it to the crate, but do not tighten too much. The smaller the length of the panel, the less changes it is subjected as a result of temperature oscillations.
- During the installation process, constantly check the horizontal of the sewed area every 3 rows.
- If there is a window in the front, then when you reach the opening, measure and remove the extra part of the panel that falls into this opening. In this case, also consider the double technological indent to 6 mm (6 mm on each side of the opening).
- For reliable fixing panels, experts recommend using a special tool - Punson. Insert the opening one in the lower strapping, another finishing element, which will maximize the laying of siding in the plane, since the depth of trimming the elements directly depends on the height of the opening.
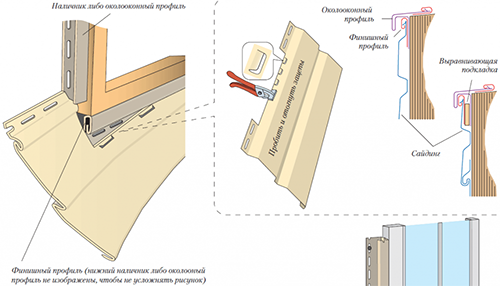
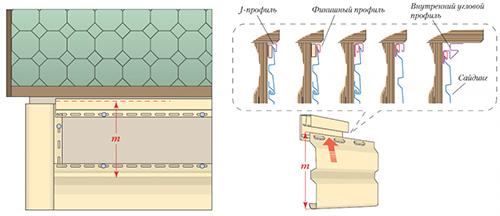
- At the end of the installation under the roof, it is necessary to attach the finishing or J-profile. This work can be done in the beginning, before installing the starting plank.

- Measure distances on different sections between the key holes of the penultimate panel and the bottom of the finish profile lock. From this value, deduct 1-2 mm (technological indent).
- Then make marking on a whole panel and cut the upper part on which the lock is located.
- Using Punson, make "hooks" and move to the outer side on the top of the siding. "Hooks" do in a step of 20 cm.
- Insert a shortened panel in the penultimate and sharp, but ripped up snapped the lock.
- Now you need to see the perimeter of the fronton. Place the fastener so that the top is at the top of the hole, and the rest were located strictly through its center. To do this, you can use an internal angular or j-profile, which can be universal if necessary.


- The finishing panel of the siding attach directly through, because it will not work in such a place in such a place.


Frontone's covering siding may seem a difficult task, but in reality everything is not so difficult. If you want to do everything qualitatively, you can practice installed on low-rise areas at home or on some construction (shed or garage).
How to seize the frontout siding in video format:
Frontones from Siding: Photo


