Those people who have a small country house are regularly thinking about increasing the space of their premises. Of course, it is not always possible, but some tricks can be taken.
Content
Most often, full-fledged extensions are used to increase the home area of \u200b\u200bthe home, which may not yield to the house itself. However, often such solutions can be sufficiently unsafe. The thing is that construction can be made on the existing foundation, and the foundation can simply not withstand existing loads.
Often experts who have tremendous experience in building business, recommend creating a small veranda. Such an extension has modest dimensions, however, for rest and everyday life is a beautiful space that has no analogues.
In this material, we will look at the main features of attaching the veranda to the brick house, as well as consider the main problems faced by the builders. It should be borne in mind that to spend the whole building process alone - it is not easy, but even newcomers can cope with the tasks assigned to the existing instructions and familiarize themselves with the main problems of the process.

The main features of the attached veranda
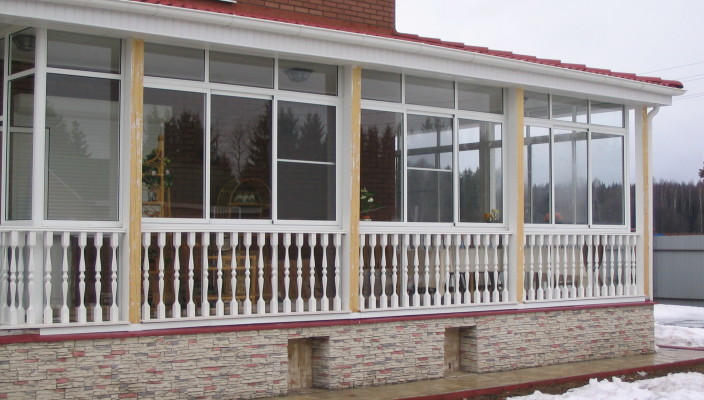
In this article, we will look at the creation of a closed veranda. This design is different from the open veranda by the fact that the presented space can be a full-fledged room, which is simply necessary for a small private house.
Despite the fact that the veranda is often seen as an open space, with the help of insulation and other insulation materials, you can get a distinguished room in which you can be in the cozy even in winter.
Our veranda will have large windows, as well as fairly thick walls. Optionally, you can install the heating system in the presented extension that the owners are not so rarely.
In the summer, on the veranda, you can simply open the windows and enjoy warm weather.
However, everything can be completely different, since the variations of the attached veranda can be a colossal amount. The main thing is to provide a comfortable stay on the veranda at various temperature modes.
Planning the creation of a veranda
To begin with, it is worth thinking about the location of the veranda. This extension can be along the end or facade part of the house. Thus, the entrance door to the room should be inside the veranda. Despite this, you need to ensure the maximum comfort of using the veranda and the main space.
Veranda are created based on the following materials:
- metal;
- wood;
- brick.
We will not talk about which of these options is the most practical, since each option has its own characteristics. Accordingly, the choice of material should follow from personal preferences.
When building a house, experts recommend in advance to take care of the location of the veranda in advance, since after that it will be extremely difficult to carry out something like this.
It is often created precisely wood verandas, as the wood is easiest to process and attach.
Wood verandas are divided into several types:
- Breed. In this case, the most common woodular log house is applied, with which you can easily create a massive veranda, durable and cozy. The diameter of the log cabin can be diverse, however, the greater this value, the more expensive the log house. To create a veranda, you do not need to have too massive logs, the main thing is that the material is high-quality and well-processed.
- Low. Obviously, ordinary wood bars are used here, which will be extremely easy to mount with novice. You can find a huge number of similar products on sale, so we can choose exactly those dimensions materials that are necessary for the construction of the veranda.
- Frame-shield. Such a type of veranda is the most elementary in terms of construction. Large wood panels (most often it is a compressed chips or fiber) have large dimensions and sufficient strength. With this scenario, the walls can be seen by clapboard, and under it to place the insulation. This option is extremely practical for those owners who want to build quickly and without unnecessary problems.
At the planning stage, the veranda will also not hurt to decide on the features of the foundation. Accordingly, you need to establish the depth of the foundation. It is also necessary to establish the features of the soil, since due to certain factors of the soil can become a serious threat to the integrity of the extension. On the basis of the information received, we can easily install, what foundation it is most suitable for us.

Required materials and tools
First of all, we will need logs or bars that we spoke earlier. The log diameter should be about 100 mm, and the sizes of bars - 100x100 mm. As foundation, we make a choice in favor of a column type. In this case, a brick will completely come down, which will be the basis.
In addition, to create a high-quality basis, except for bricks, the following materials will be needed:
- crushed stone or gravel;
- sand (necessary for creating a foundation pillow);
- hot bitumen;
- concrete;
- bugged brick.
Separately, you need to take care of the future roof. This question will need to work tight enough, as this is a very serious question. First you need to choose the roofing material. If we are talking about an extension to the house, you can make a choice in favor of the material that is used on the main structure. If the veranda wants to somehow allocate, then you can buy a steel, rolled or asbestos-cement coating.
During installation work, we need the following tools and additional materials:
- sledgehammer;
- axe;
- hammer;
- trowel;
- nail-holder;
- roulette;
- cord;
- building level.
For substantial relief of construction work, you can use an electric saw and a screwdriver.
Conducting earthworks
As already mentioned, in this case we will use a column type of foundation, so you need to carry out the following manipulations:
- First you need to dig a few holes under the foundation pillars. It all depends on what strength we need a foundation. The minimum is the placement of pillars in the corners of the design. The depth of each pit should be 1 m. All pits should be the same so that the load and structural elements are equal.
- Now it will be necessary to create a sandy pillow. It is necessary to reduce the load on the sole of the foundation from the deformation of the base. Accordingly, the sand layer should be about 20 cm. In the event that the main soil is sandy, it is necessary to do somewhat differently. The pit is covered with a layer of rubble or gravel, after which the fill with hot bitumen occurs.
- Before pouring into the pit, it is necessary to install pipes of a certain diameter (approximately corresponding to the diameter of the pit). This will allow you to confident that after the fill we will get a strictly vertical design. Pipes should be slightly higher than the soil level.
- The pit is poured concrete. It should be monitored so that the concrete structure is on one horizontal level.
If you do not fit the creation of pillars from the concrete, you can simply pour the bottom of the holes concrete and use the brickwork, which does not worse performs its tasks.
In addition, it is worth keeping in mind that flooring on the veranda should be slightly lower than in the main house. This is due to the specifics of the construction of a small on the size of the foundation.
Ultimately, the foundation pillars need to be missed by bitumen. All empties between materials can be filled with gravel or broken bricks. 
Creation of carcass veranda
For the construction of the frame, you need to have a bars of standard sizes. In our case, bars are suitable with a cross section of 100x100 mm, or 120x80 mm.
- First of all, a lower strapping is created, which will be the basis for the entire frame. In the angular compounds, such a blockage is mounted by the method "in dragged" with the involvement of a direct lock.
- Now you need to prepare the grooves with dimensions of 50x50x50 mm. Such spikes for racks are often fastening with the strapping by nail combat. Additionally, you can use special construction brakes.
- The binding and rafters are also mounted on top, which are attached with the help of the above fasteners. The ends of the rafter feet should be attached to the run, which is hidden under the rope of the roof and is attached with the stands of the veranda. You must also keep in mind that the structure of the structure, as well as the beam of the run, must be fixed on the wall using large anchor bolts.
All construction work related to the creation of a frame should be carried out as responsibly as possible, since even due to a small error, the whole design can collapse.
Creating roofs and floor veranda
Obviously, it is the process of creating a roof and gender is the most responsible. First of all, it is worth understanding that the roof can be done with a small angle of the slope of the skate, so that less building materials spent on the creation of the veranda itself.
- Before starting the roof flooring, you need to create a crate. This design is created from the boards, and the shadow step is often based on the size of the roofing material. If you speak directly about choosing a roofing resource, then it is best to make a choice in favor of which there is a major structure or similar. In any case, you need to be sure that the design being created will be durable and reliable.
- If we have made a choice in favor of the rolled roofing material, the shap must be solid. With this scenario, the roof will not be deformed or lose the initial properties. The edges of the rolled material are attached with small nails. However, it should not be allowed that the precipitation seeps inside the veranda.
- As for the roof of the steel sheet, this option can be located on solid flooring. Steel is fastened to the clamp of the nail battle.
- Often, asbestos-cement coating in the form of sheets is also used for the veranda. In this case, the material is stacked on the crate with the allen in one wave, and the upper sheet should block the lower at least 12 cm. The mount is performed using special nails.
Floor design Veranda is often very simple. It is only necessary to fix the boards on the lugs embedded between the crowns. Boards and lags must first be treated with antiseptic so that the condition of the wood material is always excellent. In addition, it will not be superfluous and coverage of paint boards.

Arrangement of walls, installation of doors and windows
For glazing the veranda, you need to use single window blocks. It is worth paying attention to the fact that the windows must have attenuating sash, as for many veranda is a space for summer holiday.
To begin with, the installation of the windows boards is carried out at 50-60 cm, then fasten it on racks. After that, it begins with clapboards or wood panels in a place near the bottom strapping, and only now comes the installation time.
Directly installation of windows is carried out by fixing the box with wooden wedges. In several places it is fixed with nails. The slots can be filled with sealants, after which the mounting of the platbands occurs.
At the very end, the installation of doors and finishing is carried out. Doors can be installed on any side, it is not fundamentally. The most important thing is the convenience of using the veranda. Immediately finishing the extension depends on the overall stylistry of the structure. Most often, conventional metal or wood wall panels are used, which in the best way combined with other objects located nearby.
Before finishing the walls should not forget about insulation and other types of insulation. If comfort in the cool seasons you need, it is worth thinking about it. The insulation is placed under the finishing material, after which you can forget about the coolness even with minimal heating.


