Polystyrene foam is a great insulating material that is distinguished by an unusually long service life. Unfortunately, its main minuses are fragility and fire hazard, and to reduce such flaws, the foam can be placed. In this article we will tell about the plaster of polystyrene foams with their own hands.
Content
Why plaster foaming
Polystyrene foam refers to very durable materials. Even after 80 freezing cycles and thawing, he absolutely does not lose its operational characteristics, which means that such a heater is capable of listening to dozens of years.
Despite the resistance to temperature drops, the foam differs fragility. It is deformed from mechanical effects, poorly tolerates direct solar radiation. If you want to choose such a material for the insulation of the building, it will be worthwhile to fly it. Thanks to this procedure, you decide a number of tasks:
- Protect the insulation layer from mechanical damage. The durable layer of plaster will prevent the formation of dents, scratches, cuts on expanded polystyrene.
- What is also useful to plaster expanding expanding outside, so this is what you can protect the walls from moisture and water. If the material is powered by a liquid, it will dry it up for a very long time, at that time the walls themselves can be sent. Among other things, the prolonged impact of moisture spoils and the insulation itself, forcing it to collapse.
- The plastering layer will protect the foam and from direct sunlight. Under the action of ultraviolet, the material becomes more fragile and brittle.
- Thanks to the plaster, you will reduce the fire hazard warming walls.

Plaster walls on polystyrene foam do it yourself
Choosing a plastering mix
To begin, it should be briefly described the steps from which the entire process of plastering walls insulated with foam:
- The first stage is the preparation of the solution from the selected plaster mix.
- The next action it is necessary to install the plaster mesh onto the working surface.
- Then there are cloud work on the grid.
- The next step of the wall is covered by the leveling layer of plaster.
- The leveling layer is maintained and ground.
- The finishing layer of plaster is applied on the wall on the wall.
Fortunately, it's not necessary to spend all work work. The process can be divided for several days, especially this is important for beginners who do not have experience in holding plastering.
Before proceeding with work, it is important to choose a suitable plastering composition. We will understand more than it is better to stucify polystyrene foam. To date, you can find goods from various firms, both domestic and foreign ones. Ceresit and ecomix brands are very popular from foreign manufacturers. The universal facade plaster "Knauf Seven" on polystyrene is also considered a good option.
If you want to save a little, buy products of domestic firms. It will cost not as expensive, but also the cheapest option is better not to acquire. Save money to the detriment of quality, you can stay in the loss.
Note that in one section of the work you need to use only one mixture, so that it is subsequently noticeably the difference of shades and structures. If you are confused from the range of products presented in the market and do not know how to specifically plaster extruded polystyrene foam, buy a universal mixture. It can be used as glue when mounting the plates of the insulation, as well as apply as a protective plaster layer. The universal mixture is used in the process of fastening the plaster grid.
Please note that the consumption of universal mixtures is large enough, so take the material with a good stock. On 1 m² of the grid leaves about 4 kg of composition, and for another 6 kg for alignment of the wall.
Before plastering polystyrene foam inside or outside the building, you need to prepare a solution. All instructions for mixing components are indicated on the product packaging, it is important to follow the designated recommendations. Note that for fixing the plaster grid, you can make a solution slightly more liquid than the manufacturer recommends, and for the leveling layer, the plaster should be drained from the tool.

Printing plastering mesh and clutter work
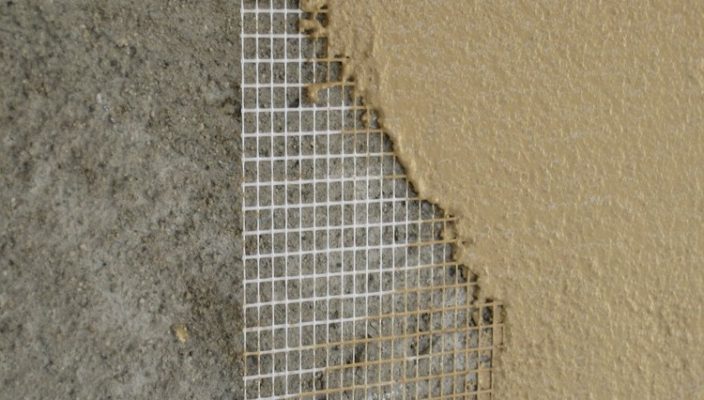
Before plastering polystyrene foam, you need to apply a plaster grid on the wall. This process is extremely necessary, since the plaster itself is practically not captured with the surface of the foam. The grid will provide good clutch.
To process the outer walls of the building, it is necessary to purchase a grid intended for facade works. It has a good density, and the higher this indicator, the better the solution will hold onto the surface. Please note that too dense mesh is difficult to treat the corners of the structure. The optimal option is a material with a density of 140-160 g / m². The grid should also be resistant to alkaline effects.
Installation of material starts with corners. We describe the process stages:
- To cover the corner of the building corners, you need to cut off the strip of a width of 30 cm. It can be different. If you glue it to the slopes, then the length must match their height. If just on the walls, then cut a fragment of about 1 m.
- In the middle of the strip is the inflection.
- Then the plaster mortar of up to 3 mm is applied to an angle from two sides.
- A grid is superimposed on fresh plaster and with the help of a spatula smoothes from the inflection to the outside and from top to bottom.
On the walls themselves, the mesh is mounted as follows:
- The grid is cut into fragments to 1 m long. Large segments are better not to do, since the plaster mix will dry quickly.
- A plaster solution is applied to the wall fragment of the wall of 1x0.9 m. 10 extra centimeters will be suitable for sizing joints. Work more conveniently with a small spatula of up to 35 cm wide. The thickness of the plaster should be 3 mm.
- On the fresh solution, apply the grid and pressed it with a spatula. Then the material is smoothed by movements from the center of the segment to its edges.
- Separate fragments are superimposed on each other. In this way, the entire surface of the wall is processed.
After sticking the mesh on a layer of facade plaster over a polystyrene, the working surface is watched. To do this, I use a special grater from plastic or wood, you can buy it almost in any construction store. On the grater fasten the canvas from the sandpaper, during operation it is periodically replaced with a new one.
Note that it is possible to rub the wall only after drying plaster. If the case is happening in summer and on the street it is hot, then the composition will dry in just a few hours. In the fall in crude weather it can go about a day or even more. In winter, it is not worth the work at all.
The working surface is treated with graking circular movements, making light pressure. Movement is more convenient to make counterclockwise. If a wet piece of solution hit the grater in the process, the sandpaper should be replaced with a new segment.

Wall leveling plaster
After curtailing work, the wall should be covered with the leveling layer of plaster, this is also quite suitable for a universal mixture. The process can be divided into such actions:
- Take a spatula, it is desirable that it has been more than 35 cm.
- Little spatula apply a plaster solution on a large tool throughout its width.
- Spend one confident movement of a large spatula on the workforce, waving the plaster with an approximately uniform layer. If clutter work was carried out qualitatively, the leveling layer may not exceed 3 mm.
- The docking of the leveling layer sections can not coincide with the joints between the grid fragments so as not to be noticeably seams.
As in the previous case, the dried aligning layer must be lost. This is done in the same way as described above. Make sure that the composition on the wall should be dry, but also try not to overtake it too long, otherwise efforts will have to make up the grout. As a rule, between the application of the leveling layer and its grouting must pass from 1 to 3 days.
After rubbing the wall should purchase a flat beautiful surface with a smooth and uniform texture. After that, it is possible to conclude final work in the form of applying a decorative finish layer.

Final Wall Playing Works
When the alignment layer is dry and was lost, the wall must be covered with primer. This is a very necessary and desired process that allows you to eliminate residual materials from the working base after previous works and reduce the water intake of the wall. To protect the walls from fungi and mold, you can choose a special antifungal composition. The finishing finish on the projected wall lies in the smooth and more beautiful, and indeed this whole process is not very expensive in terms of finance and time.
The primer is applied to the wall with a soft short-sighted or foam roller. Try to the surfaces did not form drums, work carefully. After drying the soil, you can engage in decorative wall decoration.


