
Each motorist sooner or later came across the issue of repairing its "iron horse". In case of serious damage, the car has to drive out to the maintenance station. In case of fine breakdowns, everything can be done. But in this case it will have to be pretty, to find a place where you can get to all hard-to-reach parts of your car. The solution of this issue will help your own observation pit, allowing you to spend all the repair work with your own hands, without spending a penny for renting a ramp. In addition, making everything on their own, you will save on expensive building brigades.
Content
Brief description of garage observation holes
Before proceeding with the direct construction of the garage pit, we propose to pay attention to all the main features of this object. Consider all the advantages and disadvantages of viewing pits. Highlight the goal for which this auxiliary room will serve you. Any phase of construction of monolithic structures provides for this or that technology of work. From how accurately everything will be done, the life of the garage pit depends.

Purpose of viewing pits
Sometimes during the movement there are incidents of various kinds. Driving along the uneven dirt road, you can hear an unpleasant sound, and even worse - feel a blow. The dimensions of the car do not always allow access to his bottom. In addition, you will not get after each suspicion to go to a familiar car mechanic, and it is better to inspect everything yourself. In case your car has a low landing, then access to open parts is limited. If there is no time for the installation of the jack, then the observation pit will help you.
The observation garage pit is designed to help the car owner in solving the following problems:
- gain access to damaged parts of the body;
- dismantle or install parts (silencer, gearbox, drive shaft, engine, fuel tank, crankcase protection, etc.);
- replace consumables (drain the oil, change the fuel and air filter, etc.);
- conduct anti-corrosion work of the bottom of the car;
- increase access to mechanisms and details, in case of joint repair work.

As you can see, it is possible to use a garage pit in different ways. An important feature of this premises is convenience. If you decide to equip the garage of the observation pit, then any small repair you are not afraid. In addition, all work will be much faster, since you will not need to resort to the use of additional mechanisms that allow you to access the bottom of your car.
Advantages of viewing pits
In addition to its useful destination, viewing pits have a number of advantages that allow motorists to save on an autoslemer challenge.

The advantages of garage pits include the following:
- The pit makes self repair of the car, as it increases access to the details in "complex" places.
- Having built a yam with the letter "G", you can highlight a small useful space. In it, you can equip the warehouse of the tool and consumables, or use as a celler for home spins.
- Since the room is located below the soil level, then the temperature in it is practically not changed all year round. This makes it easier to work in a hot period.
- A garage containing a viewing pit significantly increases the cost of the structure, thereby paying off all construction activities, in case you decide to sell it.
- With skillful use and location in the garage, you can equip your own hundred. If it is on the site near the house, it will help to save significantly. In this case, you will not spend money on travel to work, and I will not pay a penny for renting the premises.
Equiping your own parking place with observation pit, you will not only save on repair work, for which you have to pay to other persons, but also release a small space that is always so lacking in the garage.
Size of observation yama
Before starting to build work, the arrangement of the pit in the garage starts with the task of its size. It often happens that the garage turns into most part in the warehouse of unnecessary things that are so overlapped with all the useful space that it remains quite a bit of place.
To properly plan the sizes of the future pit, we advise you to pay attention to the following parameters:
- the size of the pit (taking into account this value, which should be 300-350 mm more than the width of the finished pit);
- the depth of the pit (this figure varies depending on the height of the garage host. But it is better to take this amount with a reserve of 10-20 cm. The main thing is that, standing on the floor of the pits, you could freely reach any item located at the bottom of the car. In case of what, the height can be compensated by installing small wooden floors on the floor);
- the width of the pit (should be 20 cm less than the distance between the internal parts of the skate of your car. This is a security requirement that reduces the possibility of driving the wheel directly into the pit);
- the length of the pit (to calculate this parameter, it is enough to add to the length of the car at least 1 m. But note that the garage does not always allow you to equip the pit of the desired length. In addition, the vehicle base form can overlap access to the pit. In any case, it should be Such a length so that you can go down in it, with a car in the garage. Call this parameter if you plan to equip two parking spaces at once);
- the proximity of groundwater (it is better to immediately learn about it than to receive an unpleasant surprise in the form of a flooded pit. In the case of their close position, the sizes will have to change, and sometimes - to abandon this ventiy at all).

Having calculated the length of the pit, consider the size of the ladder, by which you will descend. Being inside, the width should not limit your movements, and the head is to touch the bottom of the car. Pay attention to the size of the pit, which can vary depending on the material of the walls. Highlighting pita, keep in mind that it should be increased depending on the material of the wall surface.
Consider these indicators for different types of building materials, namely:
- concrete wall (the width of the pit is increased by 12-15 cm in each direction);
- the walls of gas-silicate blocks (the boiler increases by 20 cm).
In addition, consider drainage and waterproofing layer. In this case, the width of the kittlement increases by another 15-17 cm. It is also convenient to equip small niches in the walls of the observation pit. Conducting repair work, you will be convenient to put a tool there. If the level of drainage waters are higher than 2.5 m, then you will have to additionally install a drainage system that will remove excess water into the sewer. At the preliminary drawing, be sure to mark all the additional details you would like to see in your pit, then you will get an excellent result.
Looking pit in the garage with their own hands. Preparatory work
Starting the construction of the pit in the garage, it is necessary to thoroughly prepare. This process is quite thin, moreover, it requires compliance with the correct sequence of actions. To facilitate all the work, it is better to immediately get everything necessary, then the result will be on joy.
Tools and materials
Almost any type of construction work requires additional assistance. To facilitate the whole process, we advise you to immediately get an assistant, with whom it will go twice as fast. The right choice of building materials and auxiliary instrument is a guarantee of a qualitative result.
To build a viewing pit, we advise you to use the following set of tools:
- concrete mixer, jackhammer, perforator, Bulgarian;
- welding machine, screwdriver, concrete vibrator, tamping;
- pliers, knitting hook, hammer, set of keys, construction knife;
- shovels, metal vest, bath, spatula, bucket, twink, semi-alone;
- level, rule, roulette.

In addition to the above tools, you will need the following materials:
- sand, cement, crushed stone;
- bar 30x30 mm or 40x40 mm, an inches or moisture-resistant plywood with a thickness of 10-15 mm, a stream board 40-45 mm;
- reinforcement 10-12 mm, rod 6-8 mm, knitting wire 1.8-3 mm, metal corner 50x50 mm, professional 50 mm;
- primer, antiorusive plasticizer, waterproofing material (film, rubberoid or mastic), bitumen tape, primer for metal;
- maclock, Machi brush, PH2 bits, Treeless tapes, Nails, Studs, Bras, Wooden discs;
- PVC pipes d \u003d 100 mm, knees and connectors for the ventilation system;
- cable, corrugated pipe, cable, tin, rosin, lighting elements, electric machines;
- plaster, tile glue, extinguishing.

If you use our advice, and get everything necessary, then significantly speed up the building process. It will not be superfluous to take care of an additional pair of hands, since some installation processes cannot be carried out alone.
Planning Kotlovana.
Ideally, the pit is better to build before the installation of the walls of the garage. This is done at one time with the arrangement of the foundation, I have completely melted everything. The construction of the observation pit in the finished room slightly complicates the whole process, but also this option is possible. But we still advise you to take care of everything in advance. Starting the construction of the garage with the arrangement of the pit, you will facilitate your work.
For the digging of the open-terrain, you can use the services of construction equipment, such as: a tractor or hydraulic hammer. In case you started to dig a pit in the finished construction, then everyone will have to do it yourself. In addition, if the garage stands on solid rocks, you will have to carve for a long time in the rock of the pit of the required size. Sometimes it is better to postpone the construction for a short distance than to suffer over the ruins of the pit for a long time.

This will require a strong physical strength, besides, it can quickly deal with a jackhammer, which is not so good. To remove several soil cubes, you will have to spend a huge amount of walker with the vendsa, in which there will be a heavy soil. Planning a dig of the pit, be sure to consider the availability of groundwater. It is better to contact local surveyors with this question. Otherwise, your structure can simply seek or collapse.
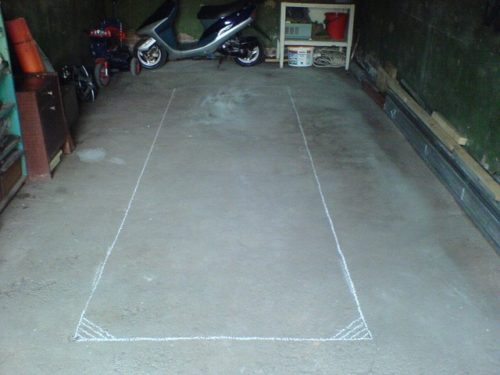
Marking of observation yama
Work at this stage implies marking both inside the finished garage and immediately before the start of its construction. Starting the markup of the observation pit, pay attention to the peculiarity of such works for each case. Capturing the pit in the built garage, keep in mind that her contour should take place at least 1 m from each of the edges of the structure. In this case, the markup is carried out with the help of chalk, which cause future sizes to the floor of the garage. This will help you to present the future dimensions of the pit.
In case of work on the street, you can use the services of heavy construction equipment. In addition, cases are not excluded when the pit has to dig in the difficult soil, then the call of the pneumomolot is not avoided. Also consider that during the work it can go rain, which will fill your hole. Then you have to wait for the water to leave in the soil, and the pit will dry completely. To place the garage pit directly on the plot, also come, as with similar work with the foundation. It is enough to have several metal rods that are installed at the corners of the future of the pit, after which they stretch the thread.
In any case, starting the work of this kind, it is better to consult with geodesists. Specify the presence of nearby soil soils. Ask about the properties of the soil. Sometimes it happens that digging a pit in some areas is not possible.
Observation pit with their own hands. Step-by-step instruction
When all preparatory work was carried out, you can start the main stage of the construction of the garage pit. We advise you in advance to ask the specialists about the quality and nature of the soil. Do not forget to also acquire all the necessary tools and material so as not to brake workflow. It is worth noting that helping you also will not hurt, so get comfortable in advance about the assistant, and better - two.
Arrangement of Kotlovana
After you have stated the pit, you can proceed to the ridge of trenches. This process is the most time consuming and complex, since it will require strong physical strength. Depending on the size of the pit, you will have to dug out and drag from 6 to 12 cubes of the soil. If the soil allows digging the pitual personally, you can save on the call of special equipment. But note that in this case the duration of earthmoving work will increase several times.
Useful advice: if a dig of the pit, you found a layer of clay, then do not rush to throw it into a shared bunch. It is better to store it separately, it is perfectly suitable for the sealing of the external sinuses around the pits walls.

To properly equip the pit for the future pit, come as follows:
- Seal the bottom of the pit with a manual tamper.
- Put the gravel around the perimeter of the pit on a layer of at least 10 cm.
- Now squeeze the sand. The layer of 5 cm will be enough.
- Failure the previous layer, then plunge gravel again. The better every layer will be rambling, the larger the base of the garage.
- Shipped with waterproofing. It must completely cover the entire surface of the floor and walls. If you use a dense polyethylene film (200 microns), then consider the material should not lie in the stretch.
- Now you need to mount the ventilation system. One channel fasten up at a height of 10-15 cm from the floor. The second is moving to the upper edge of the pit to a height of 100-150 mm so that it is located near the future wall.
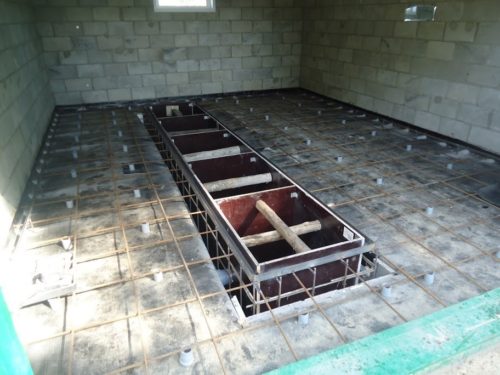
- From the reinforcement 6-8 mm and knitting wires tie Armopoyas. It must cover the entire surface of the bottom of the pit. It is placed at an altitude of 5-7 cm from the bottom. For this, you can put it on several pieces of bricks, they just have a thickness of 6 cm.
- Mix the cement-sandy solution with the addition of gravel in proportion 2: 2: 1. We recommend at each kneel to add a special plasticizer to solution. It will give the plasticity of mass, and perfectly protect the concrete from cracks during the frost.
- Fill the reinforcing screed to a height of 10-12 cm (taking into account the height of the "brick + grille" layer). It is better to pour the first layer at 7-8 cm and give it to open. After that, you can pour a solution to the remaining height.
- Give the screed to open. This will require 2-4 days, depending on weather conditions.

If you plan to install a ventilation system in the pit, then it is better to take care of it right away. In the case when it takes place under the foundation, and then displayed through the wall, you must unscrew the separate trench for pipes. Read more about the ventilation arrangement can be found in the next paragraph.
Fitting ventilation
Over time, an unpleasant shaft will appear in the pit. Unfortunately, this is not avoided, no matter how hard you try. Especially at the bottom of the pit there will always be spots from oil, fuel and other liquids, which, during evaporation, harmful substances are distinguished. Ventilation is better to do if groundwater is flowing near the garage, increasing the humidity of the observation pit.
In any case, work on the laying of ventilation pipes must be carried out before the construction of walls and fill with concrete. You can make both the autonomous option and combined with the overall ventilation of the garage. Pipes can be placed in the formwork, or impact into the wall.

The location of the pipes is due to the size and shape of the garage. For ventilation, a pipe with a diameter of 100 mm is perfect. But it is important to know that the supply pipe must be raised about 0.5 m above the ground, after which it is closed with a grid to avoid hitting large items. The exhaust pipe is raised by 2-2.5 m, and subsequently mounted "fungus", protecting ventilation from moisture and garbage. To test the efficiency of the system, bring the lit candle to the supply hole. If the flames began to suck, or it was extremely extinct, then you did everything right.
Arrangement of lighting
To find inside the pit was comfortable, it is better to immediately take care of its lighting. Some sufficiently naked flashlight or other lighting instrument, but we would advise to make a stationary lighting system. The electrical installation is thin, because it requires certain skills and knowledge. If you have never worked with electricity, it is better to trust this question by a specialist.

To monitor the correctness of the electrical work in the observation pit, use the following indicators:
- using the voltage of 220V in is unacceptable for the arrangement of the pits. In this case, the voltage is 36 V;
- all electric machines should be located outside the pit;
- the cable must be laid in a special corrugated type metal sleeve;
- lighting elements are better to use low-voltage lamps (12 V or 36 V). Installation of this kind is made in a pair with an automatic machine of the required nominal, which must be located in a separate shield;
- lighting devices are better drown in the wall, then they will not interfere with the workflow;
- use a moisture-proof option of sockets and switches.
You can also use some cunning. Locating lighting elements evenly, you will achieve brighter lighting. In addition, you can use the tile of a light shade as a finishing material, it perfectly reflects the light, making the pit more brighter. It is not bad to use daylight lamps that allow you to remove the breakdown faster and more accurately.
To better figure out the arrangement of the garage of the observation pit, we advise you to see the following video that will help do everything yourself:
Observation pit for a garage made of concrete with her own hands
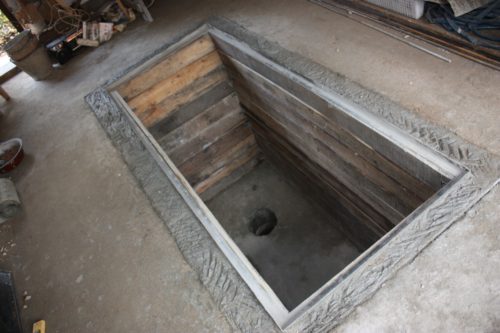
So we approached the last question associated with the arrangement of the garage pit. If you have completed work at the preliminary stage: the floor did not crack, the waterproofing is carried out correctly, the ventilation is functioning, the wiring is diluted and protected, then you can begin the construction of the walls of the pit. As a material, you can use both concrete and piece material. We would advise you to make a hole with a concrete, because it is more reliable and more durable.

To build a viewing pit at the final stage, you must conduct the following actions:
- Remove the waterproofing from the walls of the pit. Bend discover the edges and fold to the bottom of the pit.
- On the perimeter of the kittle, build an external part of the formwork. As a material, use the timber and the "inches" board. For shields, plywood or osp-plate 12-15 mm will also come up.
- In order for the solution to do not flow through the formwork slots, cover it with a film. Use the stapler.
- Build the grille from the reinforcement from the inside of the external formwork. For this, the rods of 10-12 mm and the rod 7-8 mm are used. For such a lattice, it is sufficiently size of the cell 15x15 cm. So far the perimeter of the pit.
- Return the waterproofing material to its original position so that it covers the area of \u200b\u200bthe future monolithic design.
- Start setting the inside of the formwork. Observe the parallelism of the walls. To protect the formwork from the deformation, you can install struts inside the future pit.
- Pour consistently concrete layers at 60-70 cm. Before laying the next layer, let us open the previous one.
- Now you can safely remove the formwork. Do it no earlier than 10-14 days after the fill. Let the box finally operate and settle down. Camping in the walls of Niche, go around these areas with a reinforced lattice. Additionally, they can be reinforced with a metal angle.
- The outer part of the box is treated with a special hydrophobic impregnation. You can also apply to the surface of liquid bitumen.
- On the perimeter of the pit at the top, mock metal corners. To do this, drill in concrete and metal the same holes, then fix everything with nuts and washers. You can also use flat or round professional professional. Do not forget about metal processing with special anti-corrosion products.
- A variant is possible when the wheelchair is installed differently. To do this, the vertical pieces of reinforcement 100-150 mm are inserted into the raw solution around the perimeter of the pit. Subsequently, they weld the proftrubube.
- To equip caisson pits, use waterproofing. You can also process the bottom and walls of the finished mastic, but note that it is significantly more expensive than the dry mixture.


If you mounted a metal corner around the perimeter, then it can be used as a template for the lid of the pit. Having made a wooden shield, it can be placed on a metal base, thereby configuring the car from a random check-in to the pit. In the case of styling proftrube around the perimeter of the observation pit, you will get an excellent wheelbarrow.
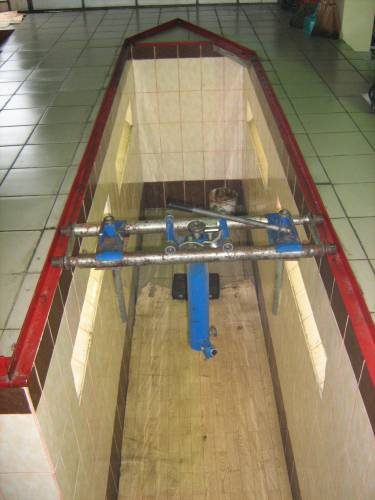
Now that our observation pit is ready, you can proceed to the finish finish of the surface. We advise you to equip a hole with a tile. Be sure to drive the surface before laying the tile. Do not forget to carefully cut the seams, then the observation pit will serve you not one dozen years.
Looking pit in the garage with your own hands, photo


