
Wiring features two types - hidden and open. In the first case, the wires are placed inside the wall and hidden the finish coating - plaster, wallpaper, panels, etc. In the second, they are attached to the wall, which makes it possible to find a breakdown at any time, replace the wire or make a wiring. But that open wiring look neatly, and pets did not risk getting a blow, wanting to try the cable to taste, it is necessary to create some kind of protection. For this, there is special accessories called the Cable Cable, and in this article we will analyze in detail all the subtleties of its installation.
Content
Purpose Cable Channel
If an open wiring is in the apartment, then the wires are located on the surface of the walls, pass under the board or from the floor. Of course, this does not mean that they should be knitted with nails and leave everything in this form. To hide the wires, you need to install a special protective box - Channel Cable.
Such a solution has a lot of advantages, starting with the fact that you will need less time to organize the wiring, ending with rapid and simple repair of a faulty section. In addition, with open wiring, you can at any time make an additional electric fiber or spend another line. Wires hidden in cable channel look carefully and do not pose a danger to children and pets.

However, open wiring has its drawbacks. One of the most tangible is the reduction of free space. If a canal cable passes on the wall or floor, you cannot close the furniture. Of course, we are talking only about a pair of centimeters, but for apartments with a modest quadrature it can become a problem. Also, open wiring is not suitable for any interior - the strict outlines of the protective box are attached to the room a certain "office", ridiculous look at expensive wallpaper and among the sophisticated furniture.
The width of the channel cable should allow any wire to hide it, but the best option will be products with flexible multi-breeding veins. Flexible cables are much easier to put in the longitudinal groove and bend on the corners.

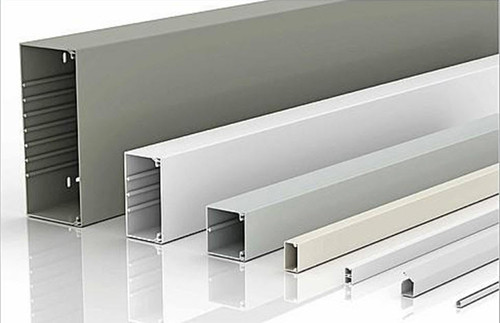
Cable Channel consists of side walls and connecting their backs. The open part is closed by a special lid on latches with a double lock. There are many varieties of channels for wires that differ in the form, sizes and material from which they are made. In shape they can be p-shaped, rounded, triangular and even curved. Inside there may be partitions forming hollows for individual cables.
Most often, the channel cable is made and sold with segments of 2 m long. But to hide the open wiring a little to buy only them - it is necessary to purchase a whole range of accompanying accessories - angular and swivel inserts, plugs, socket modules, etc.
Select Channel Cable
As we have already spoken, the cable channels are different in shape, structure and material from which they are made. So, on the market you can find steel, plastic and aluminum products.
Consider each option in more detail:
- Metal cable channel - suitable for outdoor and internal work. The main plus is a wide color palette that allows you to choose an option for any interior. Protected from rust coated with galvanized steel.
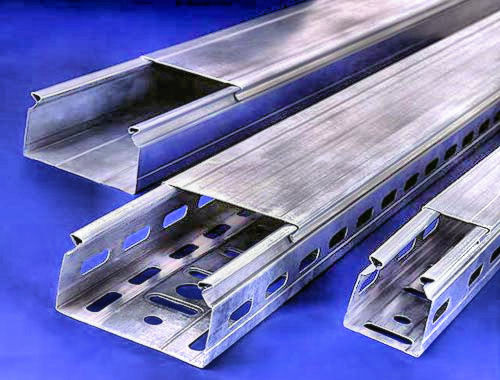
- The galvanized channel cable is made of aluminum, which is known, is not subject to corrosion, so it can safely be used to protect cables outside the house. Different with enviable durability and aesthetics. Aluminum and steel cable Channels are completely fireproof, unlike the next "candidate".
- Plastic Cable Channel is the cheapest, and therefore the most popular option for use inside the house. Made of plastic with various additives that increase strength and durability. There may be different colors, but mostly used white products. If the choice fell on the PVC box, it should be borne in mind that only one wire can be placed in one cell. With small section sizes, the channel cable double lock is optional.


Installation Channel Cable
The installation depends on the technical characteristics of the channel cable and its location. In this chapter we will tell about the installation of wall and floor models.
Preparatory work
Regardless of the model of the selected channel cable, work should be started with calculations. First, determine how much material you need and what the nomenclature is. To do this, create a plan of an apartment or individual rooms, where installation will be carried out.
Each wall should be displayed separately and so that a clearly visible path of the channel cable is clearly seen, all accessories that will be needed for installation and its meter. Be sure to turn on the outlet and the instruments that you will connect to them. Cable Channel can be positioned at any level - even in the center of the wall. There are no strict requirements, so it can be favorably beat, scorched to the interior.
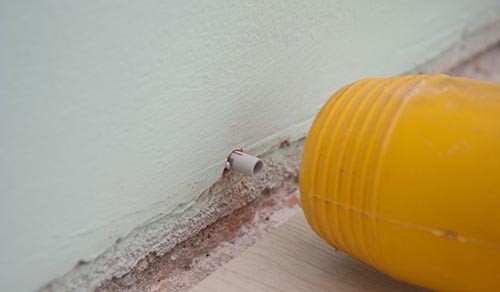
Before installation, make sure that the walls of the walls should be made and prepare them properly, especially if you attach the cable channel for glue. This is the fastest installation method, but it requires an ideally smooth surface. There are also restrictions on the size of the channel - only small models containing no more than 3 wires can be seen on the glue.
If the wall has a drop, roughly plastered or completely deprived of the finish coating (naked concrete or brickwork), the channel cable can be fixed with a dowel. This method of fasteners is quite time-consuming, but the most reliable and suitable even for heavy hooks with "ohaphages" of wires inside. For drywall walls, it is recommended to use butterfly dowels, and they can be attached to the wooden surfaces with screws or ordinary nails.

When you were determined with fasteners, you can proceed to the wall markup. To do this, put a simple pencil point at the channel setting level (usually 30-40 cm from the floor). Attach a meter rule to this point and place it in terms of level. Also for this you can use the indicator cord or laser. Spend a line or take it off with a cord, going through all the walls where the wiring will be attached.
Installation of wall cable channel
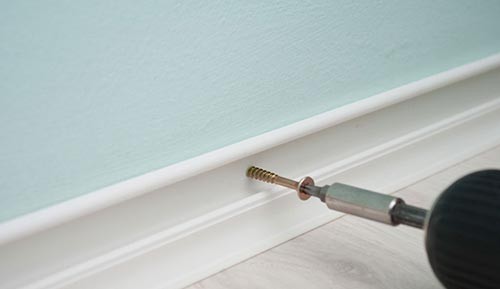
If you chose the screws as fasteners, it should be installed with a certain interval depending on the load cable. The load, in turn, is determined by the number of wires inside. For reliable fixation on the drywall or wooden surface, screw is better screwed every 40-50 cm. With uneven walls, the step is recommended to reduce to disguise the flaws and gaps.
If you have to work with a concrete wall or brick masonry, the installation of the channel cable is better to produce on a dowel. To do this, you will need a perforator with a nozzle with a diameter of 6 mm. The dowel is installed in a step of 40-50 cm, but if the weight of the channel cable is large, the distance is reduced.
Progress:
- In the bottom of the channel cable, drill holes with the necessary step. Before you remove the protective cover and attach the channel to the wall so that the attack points match. If the wall has strong irregularities, the channel can be slightly bend, but in this place it is better to fasten two dowels at a distance of 5-7 cm.
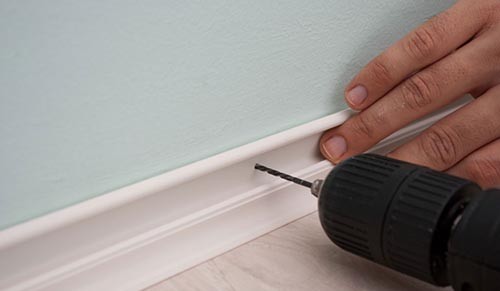
- Screw the channel to the wall. If screws are used for attachment, choose a length of 5-6 cm.
- It remains to pave the cable. It is often impossible for each wire to highlight its cell, so for those that go to the outlets, select the lower part of the channel, and lay the switches from above.
- Cable cable very carefully so that they do not stick to the lid, and it could be easily snapped.
- Leave the reserve of space to install sockets.
- After laying all the wires, install the decorative lid.


If the cable channel for wires should be installed on a thin metal to 2 mm or an aluminum profile, it is better to choose bugs as fasteners - special screws for metal. The principle of installation is exactly the same as in the case of a dowel. On the video below it is shown in detail how to mount the Channel Cable to the wall:
The easiest and fast attachment method are liquid nails - special superfoot construction glue. You can use them if none of the above installation methods is suitable. Often to the adhesive method are resorted to install a channel cable in the bathroom on the tile or metal surfaces. The disadvantage is that the adhesive mixture does not have good adhesion with these materials and is more used as a fixation amplifier.

Rules for fastening Channel Cable for Glue:
- Make marking on the wall.
- Apply a thin strip of glue on the back of the box.
- Leave the box to the wall on the markup.
- When you lean the rear wall, move it away and wait a minute to the other, so that liquid nails become more viscous on both surfaces.
- When the glue slightly "grab", press the channel cable to the wall with great strength, but do not break it.
- Hold it in this position 30 seconds, then set the next segment in this way.
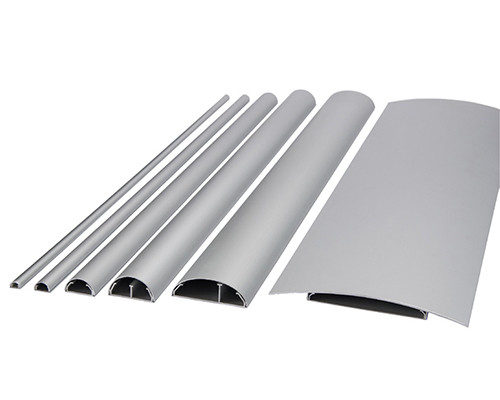
Outdoor canal cable
This type of cable channels deserves separate attention. Such products allow you to completely imperceptibly hide any wires without risking to spoil the interior design. All due to the fact that the design of the channel cable is combined with a plinth. After installing a new floor covering, instead of conventional plinths, you can choose those in which there are special hollows for wires. Thus, you decide at once two problems and you will not overload the interior with extra details.

Advantage of floor cable channel:
- Sufficient flexibility of the plastic product allows you to work even with uneven walls.
- You can pick up a color for any floor covering or wall decoration.
- The possibility of repeated use with careful installation and dismantling.
- It is easy to hide the wires to it, while the plinth does not even have to shoot - you can simply bend the edge and squeeze the cable there.
- Channel cable weight does not matter because it relies on the floor.
- Low cost compared to conventional wooden plinths and metal cable channels.
Before installing such a plinth, it is also necessary to make marking on the floor and on the walls, while taking into account the size of the channel cable. To calculate how many meters the product will be needed for one room, measure the total area (multiply the width to the length) and deduct the width of door openings from it. To the resulting result, add 9%, which will go on trimming. Consider the number of angles - for them special connecting parts will be required.

Contrary to popular belief, plastic plinths with cable channels are attached not to the floor, but to the wall. The installation is carried out according to the same scenarios as for wall articles - dowels, screws or liquid nails (depending on the material of the wall).
Start the installation of the internal cable of the channel follows from the angle in the most visible part of the room, trying to use one-piece profiles.
Progress:
- Remove the plug from the channel.
- Insert the profile into the angle.
- From the opposite part of the plinth attach the plastic connector.
- If the wall is longer than the profile, cut off the missing piece and put it back to the previous one.
- Press the wall profile with one hand and make sure that there is no clearance between the floor. Holding it in this position, drill the holes for fasteners with a pitch of 30 cm.
- Increte a vacuum cleaner work.
- Insert the fastens into the holes and lock the plinth.
- Gently install the plug so as not to break the latches.

We described general principles how to install a channel cable, and we hope that they will help you make a neat open wiring in the apartment. As for the installation of protection for wires on the street, to do this, use only galvanized fasteners so that they are not injured from rust.


