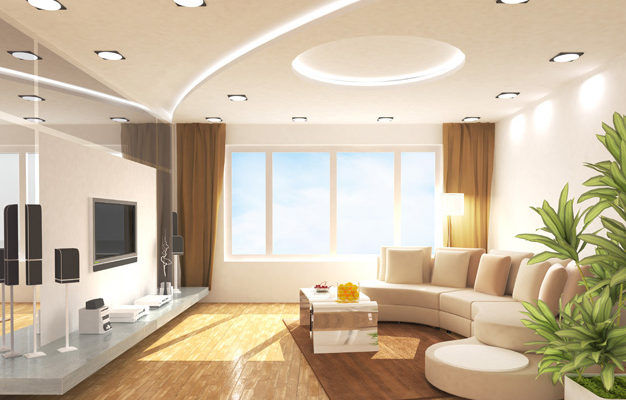
In order to preserve the appearance of the apartment in good condition for a long time, it is required to periodically carry out cosmetic repairs. An important element of any room has always been considered a ceiling. Thought, irregularities, cracks and herones on it often spoil the look of the entire dwelling. Therefore, it is necessary to approach its repair with a special responsibility, adhering to all rules and technologies. Recently, two-level structures have become popular. In this article, we consider the stages of the construction of various options for the two-level ceiling of plasterboard.
Content
Duplex plasterboard ceiling: advantages and types
The two-level ceiling has the following advantages:
- Aesthetic advantages - Beautiful appearance. Duplex structures look more attractive than ordinary ceilings. In addition, multi-level structures can be made any shape and size, which will make many interesting items in the design of the room.
- Such designs are capable of visually reduced or, on the contrary, expand the area of \u200b\u200bthe room. With the help of multi-level ceiling, you can zonate space, which is particularly relevant when planning studios apartments.
- Functional advantages. The two-level ceiling device is planned in such a way that in the gaps between the levels it was possible to gently hide various communications (wiring, lighting cable, ventilation system).
Multi-level ceilings can be collected from various materials. The most popular options are:
- Plastic structures. Suitable for premises with high levels of humidity (bathrooms, bathrooms, shopping and storage space).
- Two-level stretch ceilings. They are collected from the vinyl canvas. Designed both for residential and non-residential premises.
- Wooden designs. Designed for premises with a stable humidity level. Most often, wooden panels are facing the ceilings in rooms equipped in a classic style.
- Plasterboard structures (GLC). Plasterboard panels are most often used to repair the ceilings in residential apartments and houses.
Next, we consider how the installation of a two-level ceiling from drywall is carried out correctly.
Duplex ceiling circuit made of drywall
Regardless of which material is used for facing the surface, the main two-level design is the framework. From the quality of its construction, both reliability and the appearance of the future ceiling depends. Therefore, it is impossible to start assembly work until the diagram and the drawings of the two-level ceiling are compiled.
Ducts of two-level structures are drawn up as follows:
- The diagram indicates the size of the entire surface of the ceiling. On our example, the installation of the ceiling with dimensions of 4x3.75 m is considered.
- Mustically schematically be shown the location of the first level of construction. For example, it is most often located in the center of the room.
- Next is placed how the second level will be installed. In our case, it will be placed around the perimeter of the room.
- Then there are areas where guide curtains will be placed.
- The dimensions and placement points are indicated. Usually, the profile for the frame is set at a distance of 45-50 cm from each other.
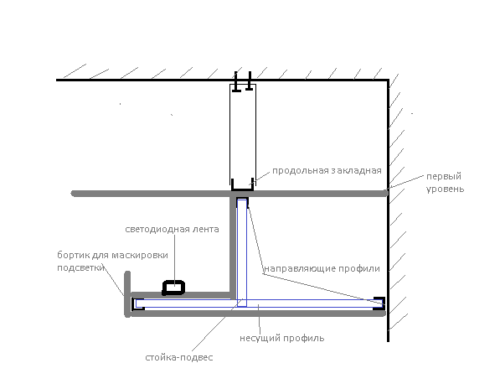
- It is distinguished between the first and second level of the ceiling. Most often it is 30-45 mm. Such a segment should be enough to place all the necessary communications in the gap between the levels.
- There are points where lighting devices will be located.
Sample drawings of duplex structures:
Materials and tools for a frame of a two-level ceiling
As mentioned above, the basis for the two-level design is the carrier frame. Its installation is the most difficult and time-consuming stage of work. How to make a clamp on the ceiling correctly and quickly - consider further. Thus, the ceiling cutter under plasterboard panels is made of wooden bars or made of metal profiles depending on the form of a future design, the state of the main ceiling overlap, as well as climatic conditions in the room.
Wooden rail or timber is one of the cheapest building materials, so they are often used in order to reduce the cost of repair work. This is one of the main advantages of such structures. In addition, the tree is fairly easily processed, which makes it more convenient when fitting the ceiling crate in the presence of large irregularities and other defects.
The disadvantages of such a design are more than advantages. The most important of them are:
- The inability to use wood in high humidity places.
- The need for additional processing of wood before installation (antifungal and fire-fighting solutions).
- Limit of forms of such a design. When using a wooden rail or bar, make a multi-level ceiling or the surface of an unusual form will not work. It will also be problematic to omit the design by the magnitude of the thickness of the timber, which will not allow you to mount, for example, point lamps.
Given all the advantages and disadvantages of the wooden crate, you will choose our choice on the construction of a frame of metal profiles.
To begin with, consider the advantages of the carcass ceiling from metal products:
- The relative cheapness of the material.
- Good performance, practicality.
- The possibility of installing indoors with high levels of humidity.
For mounting the frame of the ceiling from metal products, we will need the following tools and materials:
- Metal profile for mounting with a cross section of 2.7 by 2.8 cm.
- Suspensions for fixing metal profiles.
- Fasteners - self-tapping screws, dowel-nails.
- Dampfer tape.
- Hacksaw and scissors for cutting metal profiles.
- Small power screwdriver for home use.
- Construction level to control the correct construction of construction.
- Lace for packing level.
Installation of a two-level ceiling of plasterboard
Installation of a two-level ceiling is a rather difficult lesson and without work experience to make it will be independently problematic. The whole process can be divided into two parts:
- Installing a draft ceiling.
- Setting the level ceiling.
Installation of the first tier of the two-level ceiling of plasterboard
The first stage of work is carried out in the following order:
- The installation of the draft ceiling starts with determining the level of its installation. To do this, you can use hydraulic or laser levels, as well as a painting lace. The control line is applied throughout the perimeter of the room. Then the bypass profile is installed. It is attached to the wall using fast mounting dowels. If there are no standard holes in it, they are drilled independently with a step of 40 cm.
- Then the prepared profile is applied to the wall so that it is over the drawn line. On drilled holes, labels are made for which holes in the wall are drilled. After that, the profile is fully fixed with the help of a dowel.
- The next step on the ceiling is installed transverse lags. It is precisely the sheets of plasterboard. To do this, measure the distance between the opposite walls, and chop the profile on the measuring lengths.
- The installation of longitudinal profiles is made in 40 cm increments. The fact is that the width of the standard sheet of plasterboard is 1.20 m, and in this case the sheet will lie on 4 profiles. They need to be placed so that the joke between them lay on one of the profiles. Transverse profiles to the waterproof are attached with the help of special self-tales.
- After that, transverse profiles are attached to the ceiling. For this, special suspensions are used. They are fixed to the ceiling with a dowel, and then profiles are attached to them with self-draws. Before fastening the profile to the suspension, their position must be checked by level.
- If the width of the room is more than 2.5 meters (just this length of the sheet of plasterboard), then the transverse profiles at the place of the joint are connected by jumpers. Also, according to the project of installing the second ceiling level, it is necessary to install profiles to secure the framework.
- When the frame is ready, you can start the fastening of plasterboard sheets. To do this, you may need the help of another person. Raise yourself the sheet will be quite problematic, and it still needs to be held. Plasterboard attached to profiles with special self-tapping screws.
- After the draft level is over, the joints between the sheets of plasterboard are covered with sickle (ribbon for putty) and putty.
Installation of the second level of plasterboard ceiling
Installation of the second level should pass strictly according to the drawing of the ceiling:
- According to the drawing, the second-level frame profiles are applied. Special attention should be paid to the radius elements.
- Next, you need to cut a profile along the length of each element. In order to make a radius, profile shelves are cut in 50 mm increments. At the same time, it is necessary to ensure that the position of the nozzles coincides on the opposite shelves. Otherwise, get a flat detail will not work.
- Radius are installed along the line drawn on the ceiling.
- The next step is set by the remaining framework details.
- On places of docking plasterboard elements, a mortgage profile is installed so that the joint does not hang in the air. For greater strength of the second level frame, jumpers are installed.
- When the frame is ready, you can proceed to its trim.
- Cut figures from drywall is better than an electroll with a shallow saw.
- The bands for the closure of the second level ends are slightly cut, so that it can be easily bent.
- After the frame is covered, it can be placed and painted.
Illuminated two-level ceiling
For mounting plasterboard ceilings with backlit, fluorescent and LED lamps are increasingly used, as well as LED tapes. LED based lighting technology allows you to use illumination of different colors. It will help make the ceiling glow diverse and unusual, even using low-cost monotonous plasterboard panels. In addition, LED lamps do not highlight a large amount of heat that is harmful to the ceiling.


