Many houses have uneven walls that simply need finishing work. You can put the surface in order using plastering. Unfortunately, practice shows that people without experience only acquire numerous problems in this repair process.
Content
In this material, we will consider the basic details of the finishes of concrete walls by plaster, and also analyze some subtleties that often and affect the final quality of the work.
Features plaster
If we talk about the quality of the work carried out, then first of all it is worth paying attention to the construction standard SNIP III-21-73. On its basis, it is possible without any difficulty to carry out the entire repair process. But at the same time, the overall quality of work is based on the following paragraphs:
- With conventional surface plastering, there are permissible deviations. This is not more than 3 mm per 1 m surface, also this value should not exceed 15 mm on the entire room. If we are talking about the ceilings, then there is no more than 7 mm deviation if the ceiling height is 2.5 m. There may also be a smooth irregularity, which should be no more than 3 units on 4 square meters. The height (or depth) of these most irregularities should not exceed 5 mm. For each meter horizontal, the deviation should not be more than 3 mm.
- To improve plaster there are more stringent requirements. Within the framework of the vertical surface, it is no more than 2 mm per 1 m, as well as no more than 10 mm on the entire perimeter. The depth of irregularities can reach no more than 3 mm, and there must be 2 or less of them. Horizontally deviations are allowed the same as in the case of a vertical.
- With high-quality plaster, the State Standard sets even more serious framework. We are talking about the deviations along the vertical surface of not more than 1 mm per 1 m, as well as no more than 5 mm on the entire finish area. Horizontally, the allowable deviation is similar. Also allowed 2 irregularities, the depth of which will be no more than 2 mm for 4 square meters. m.
Wall alignment options
There are 2 options in total:
- The level of alignment by lighthouses. Most often, this method is involved in situations with too strong irregularities. Accordingly, in such situations, it will help to get a decent result only beacons for which it will be possible to navigate in the process.
- With the help of the rule, the alignment occurs in situations when the surface is initially relatively smooth, however, small deviations are still present. In the same way, you can try to spend alignment and too deformed surfaces, but for this you need a considerable experience.
Cost of work performed
Experienced owners recommend finishing work with solely on their own, as this will save a significant part of the funds. On average, the cost of these works is about 500 rubles per square meter. These are a lot of money, especially considering, perhaps not the most imperious budget for all repair activities. Therefore, it is necessary to personally study the technology and try to spend all the work with your own hands.
If the area of \u200b\u200bworks is small, then perhaps third-party help will be the most correct solution.
For example, if you need to set the finish of the surface in 100 square meters, then all this will have to spend tens of thousands of rubles, and it is still without taking spending directly to the materials.
Best mixture for plaster
It is known that the most common options are products based on cement or gypsum. Practice shows that the well-known brands have long been producing high-quality products, which in a responsible moment will definitely fail.
Experts are recommended to give preference precisely plaster mix:
- with its help, you can provide high adhesion of the material being applied;
- layers can be applied with a thickness of up to 50 mm, and a single crack will not appear in such a situation;
- the plasticity of the material is high, so on this basis it is possible without unnecessary difficulties to obtain the desired surface;
- even without the use of the reinforcing base, it is possible to apply a gypsum mixture over a smooth concrete;
- it is known that the gypsum provides a good level of sound insulation, and also keeps heat inside the house.
Using beacon profiles
Beacon profiles are metal elements that have perforated holes. They are peculiar limiters in the process of surface plaster. Length for beacon profiles is often standard - 300 mm, and the depth can be either 6 mm or 10 mm.
As for the rule, this tool is a long rack created on the basis of aluminum. It is used to align the mixture, but not only for plastering, but also in many tasks related to repairs.
Required tools and devices
Often, the following list of inventory is required:
- plaster mix;
- dowels;
- hammer;
- plumb;
- lighthouses;
- perforator;
- building level;
- scissors;
- rule;
- bucket;
- primer;
- roulette;
- gloves;
- roller
The process of plastering walls
When all the above-mentioned tools and components of the process are in stock, you can start work, but it all starts with preparatory activities.
Use of beacons and surface markup
- To begin with, it makes sense to carefully examine the surface. With the help level, you need to check the wall and make sure it is suitable for repair. If substantial flaws are found on the surface, they should be noted that in the process of plastering on them you can pay attention first.
- The next step is to carry out markup for lighthouses. It is necessary to analyze which wall is the height, and what area we will be transferred to plastering. Next, you can easily determine how many profiles are needed for repair. If there are data on the size of the room, then it is initially better to draw a plan on the leaflet.
- Directly the distance between the beacons should be limited to 1.6 m. This value is quite comfortable, so that you can work with the help of the standard rule that is often two-meter.
- The distance between the beacons may be less than 1.6 meters, especially if the repair occurs around the doorway.
- Before installing beacons, you need to drill holes for fastening these very elements. After the holes, the dowels with self-draws are clogged, which are completely free to keep beacons on the surface. Sometimes the dowels are driven without self-tapping screws. Fastenings should be evenly distributed over the surface, which will subsequently succumb to the finish.
- Within the next step, you need to carry out the surface of the surface. As a result of this process, we obtain better adhesion, as well as minimizes the negative impact of various components, possibly present on the surface. If the wall consists of a brick or aerated concrete, then you need to apply large volumes, since these surfaces differ high absorbability. If we are talking about a concrete wall, then concrete contact is often used.
- After drying the wall, you can continue screwing the screws. Immediately after screwing the fasteners, you can use the rule and see if there are some deviations on the surface. Perhaps it makes sense to twist the screw of the self-press in order to obtain the optimal location of the element.
- To make sure the fasteners are correct, you need to pull the cord between them and make sure that the profiles are located as needed. According to such a principle and the alignment of the screws is aligned, and then the installation of metal elements is directly.
- Next occurs the preparation of the plaster mixture so that the lighthouses can be consolidated. In this case, you will need a bucket that is filled with a small amount of water and the mixture. Relationships need to be viewed directly on the instructions for the mixture. The mixing of the mixture occurs with a perforator with a special nozzle. The consistency of the material is also an important topic. Experts compare the perfect state of plaster with cottage cheese. It is also important to remember that the finished material should not fall from the tool.
- Apply the plaster needs along the line so that the mixture is not higher than the caps of the fasteners. The metal profiles in the mixture occurs. It is recommended to conduct this event together, the first person presses from above, and the second is from below. So you can get a decent result.
- With the help of a building level, you need to make sure that the location of the beacon is correct until it can be corrected. Directly before the mixture dried, its residues should be removed from the rules, otherwise the material dries.
We apply a mixture
- Stuccoings of walls begins with the preparation of the solution. For this you need a bucket, which is filled with water by the third. Using a perforator with a special nozzle, a mixture is stirred.
- The density of the solution is a serious question. It all depends on which layer will be applied to the surface. It is known that the thickness of the layer of plaster is needed, the mixture should be thick.
- Immediately before the process of applying plaster, the wall may be moistened, but only if the surface is easily absorbed by moisture. You need to wet not all the wall, but exactly the site that will at the moment will be to apply the material. If you do not take care about it, then the surface can crack enough and have too low strength.
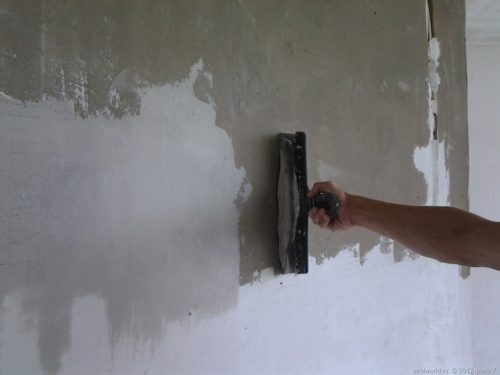
- The alignment of the mixture occurs from the bottom up, and the layer of plaster, which is applied to the surface, should be smooth and without the slightest pass. While the material is plastic, it can be submitted corrections without the slightest consequences.
- A sharp facet rules should be led on the surface. The tool must be kept perpendicular to the corners, since otherwise the unnecessary volumes of the material will occur. Excess the mixture must be removed using a spatula.
- If there are bubbles or significant irregularities on the surface, you need to immediately remake everything, re-dissolve the mixture and give it the corresponding appearance. Bubbles on the wall indicate that in specific places the mixture does not reach the surface. With a spatula, you can remove too much and sketch again, using the rule to align.
- Zigzag movements by the rule will make the surface of the most even, removing all the excess volumes of the mixture.
- After that, a new layer of the mixture is applied, and all the above activities are simply repeated. With each layer, it is easier to do work, since the end result becomes closer.
- The layers should be equipped in such a way that lighthouses are in-depth in the material. After that, when the material is applied to the surface, you can delete beacons. If you do not make this on time, then these elements released on the basis of metal can be powder, and the surface will become unattractive. From above lighthouses enough to pick up with any metal tool and pull profiles down.
- It turns out the shoes that need to quickly close. We already have a flat surface, and on the basis of this value it is necessary to make alignment of emptiness, where they used to be profiles. With the help of a spatula, you need to apply the mixture and spit it into its X-shaped movements.
The grout process of plaster
This stage of work is concluding, and it is he who most affects the attractiveness of the surface that will result in the end.
- This process is carried out even before the plaster dried, since the plasticity of the material allows you to get the necessary result. Immediately before the grout, the surface is again moisturized with water.
- The solution is applied to the smoothness, after which it is smeared with the finest layer. After that, smoothed at an angle of 45 degrees. It is advisable to make a strong push to increase the quality of the surface.
- The smoothing process must be carried out until the stuffing of the material remains on the smoothing.
- The above actions are carried out over the entire surface, but only on the specific sectors, as they will definitely not succeed in high quality the walls at once.
Other details
- Special attention should be paid to the thickness of the created layer. Practice shows that if plaster is applied to the surface for further cladding with tiles, the layer of material should be at least 10 mm. Moreover, this applies even to surfaces that are originally relatively smooth.
- For beginners, the process of applying plaster may seem not easy, given the subtleties of technology, as well as a large amount of inventory necessary for work. However, practice shows that to obtain at least a small amount of experience, you need to see the repair process with your own eyes and make some conclusions. Sometimes in repair activities require sufficiently difficult solutions.


